# Splicer System_User Manual_V01
# Reference Name Explanation:
protocol: refers to the web protocol, e.g., http or https
host: refers to the access host, e.g., 127.0.0.1
port: refers to the access port, default: 9090
# 1. Splicer Homepage Overview
# 1.1 Access Path:
{protocol}://{host}:{port}/#/
Example: http://127.0.0.1:9090/splicer/#/
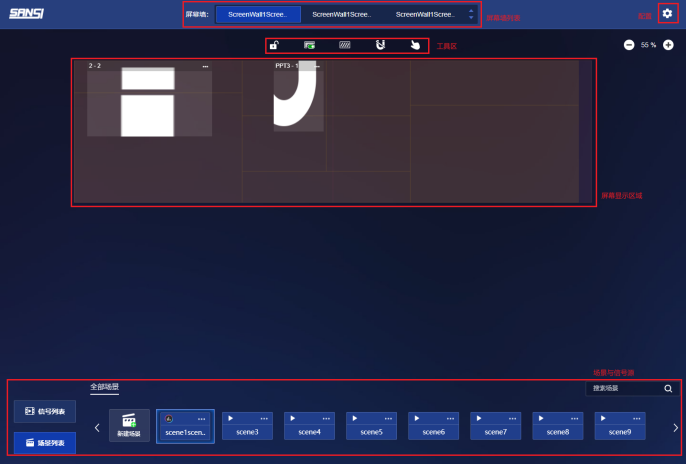
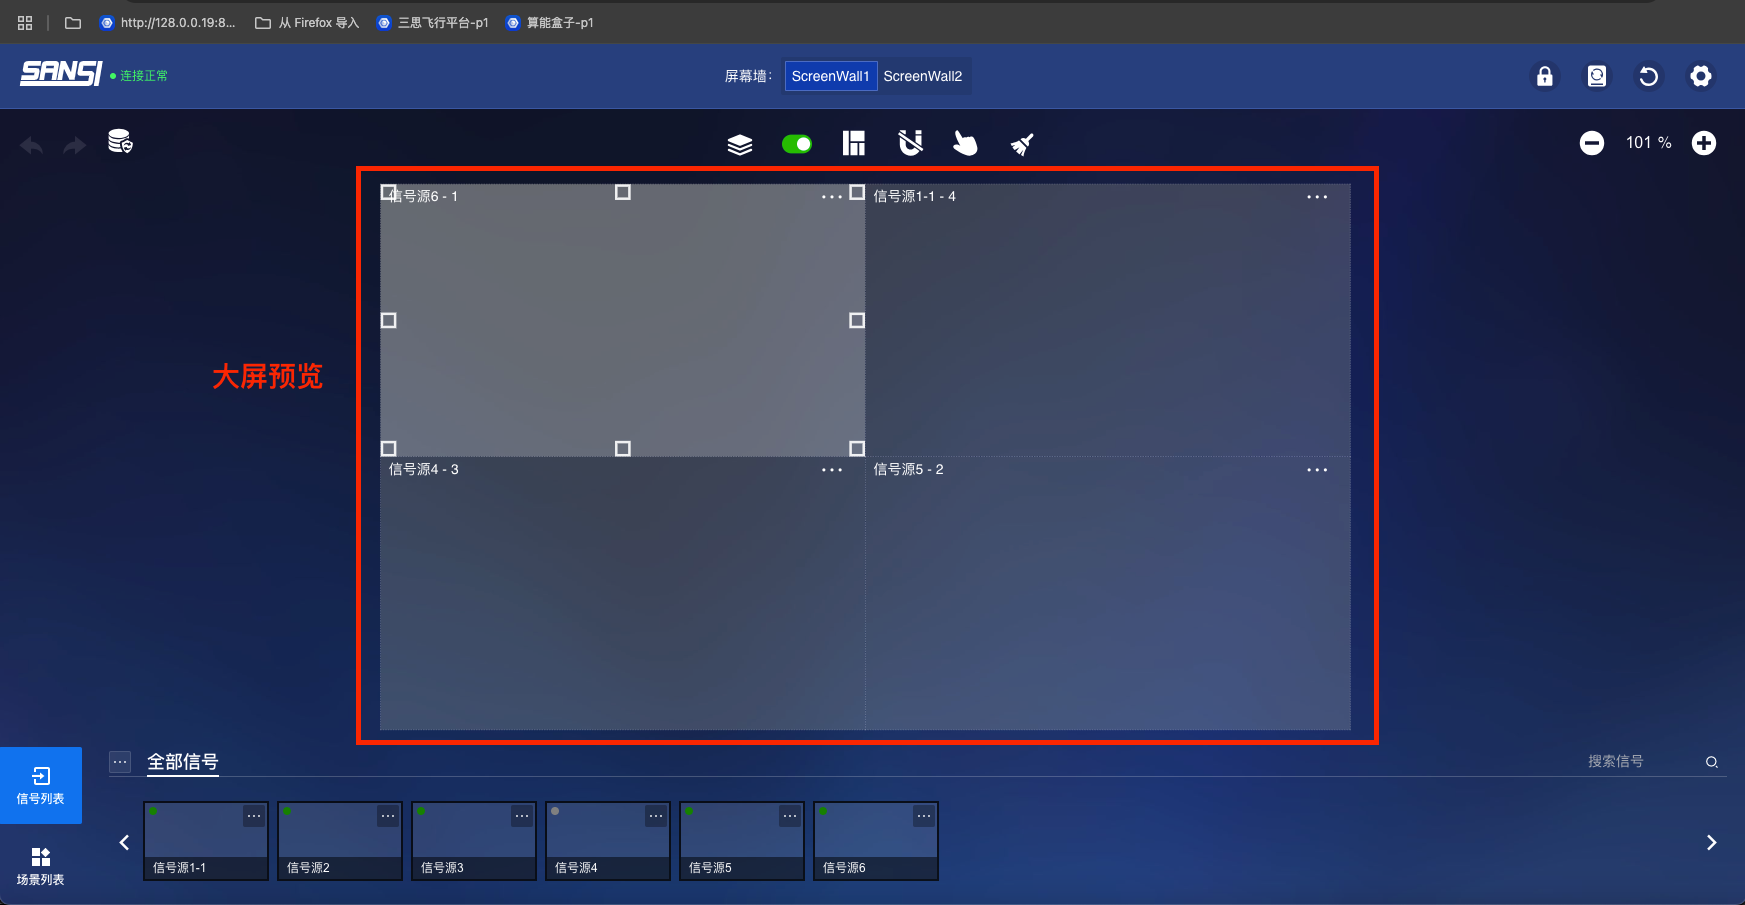
# 1.2 Interface Preview:
# 1.3 Function Description (Page divided into 4 parts):
- Screen Wall List (top of the page)
- Toolbar (top of the page)
- Screen Display Area (middle part of the page)
- Signal Source List (bottom of the page)
- Scene List (bottom of the page, switchable with Signal Source List)
# 2. Screen Wall Switching
# 2.1 Page Location:
Homepage -> Top of the page
# 2.2 Screen Wall List:

When there is more than 1 screen wall and the user has screen switching permission, all screen walls in the current system will be displayed in a list. Clicking on one will switch to the corresponding screen wall, showing the corresponding screen window preview and scene list.
# 2.3 Screen Wall List Pagination:
When there are more than 3 screen walls, pagination will be displayed. After clicking, if the user has screen switching permission, it will switch to the next screen wall.
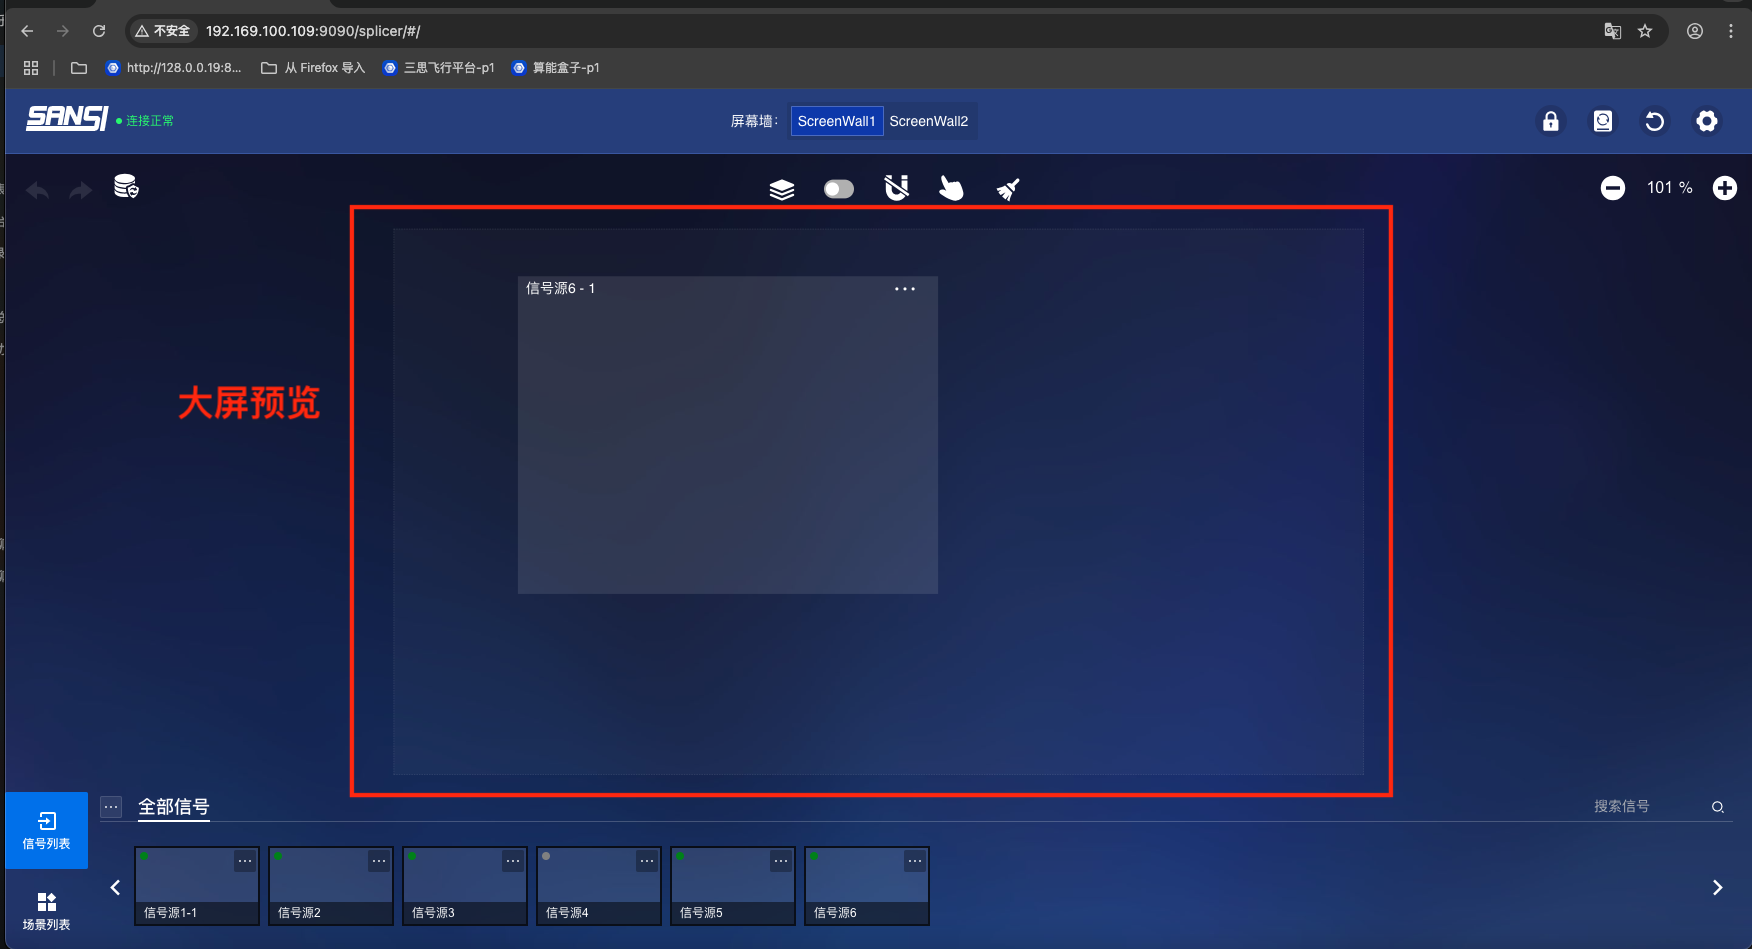
# 3. Screen Preview
# 3.1 Page Location:
Homepage -> Middle of the page
# 3.2 Toolbar:
# 3.2.1 Includes 5 tools in sequence:
- Physical Device Area
- Virtual Slot Enable/Disable
- Window Magnetic Attraction
- Window Lock Status
- Clear All Windows in Current Scene
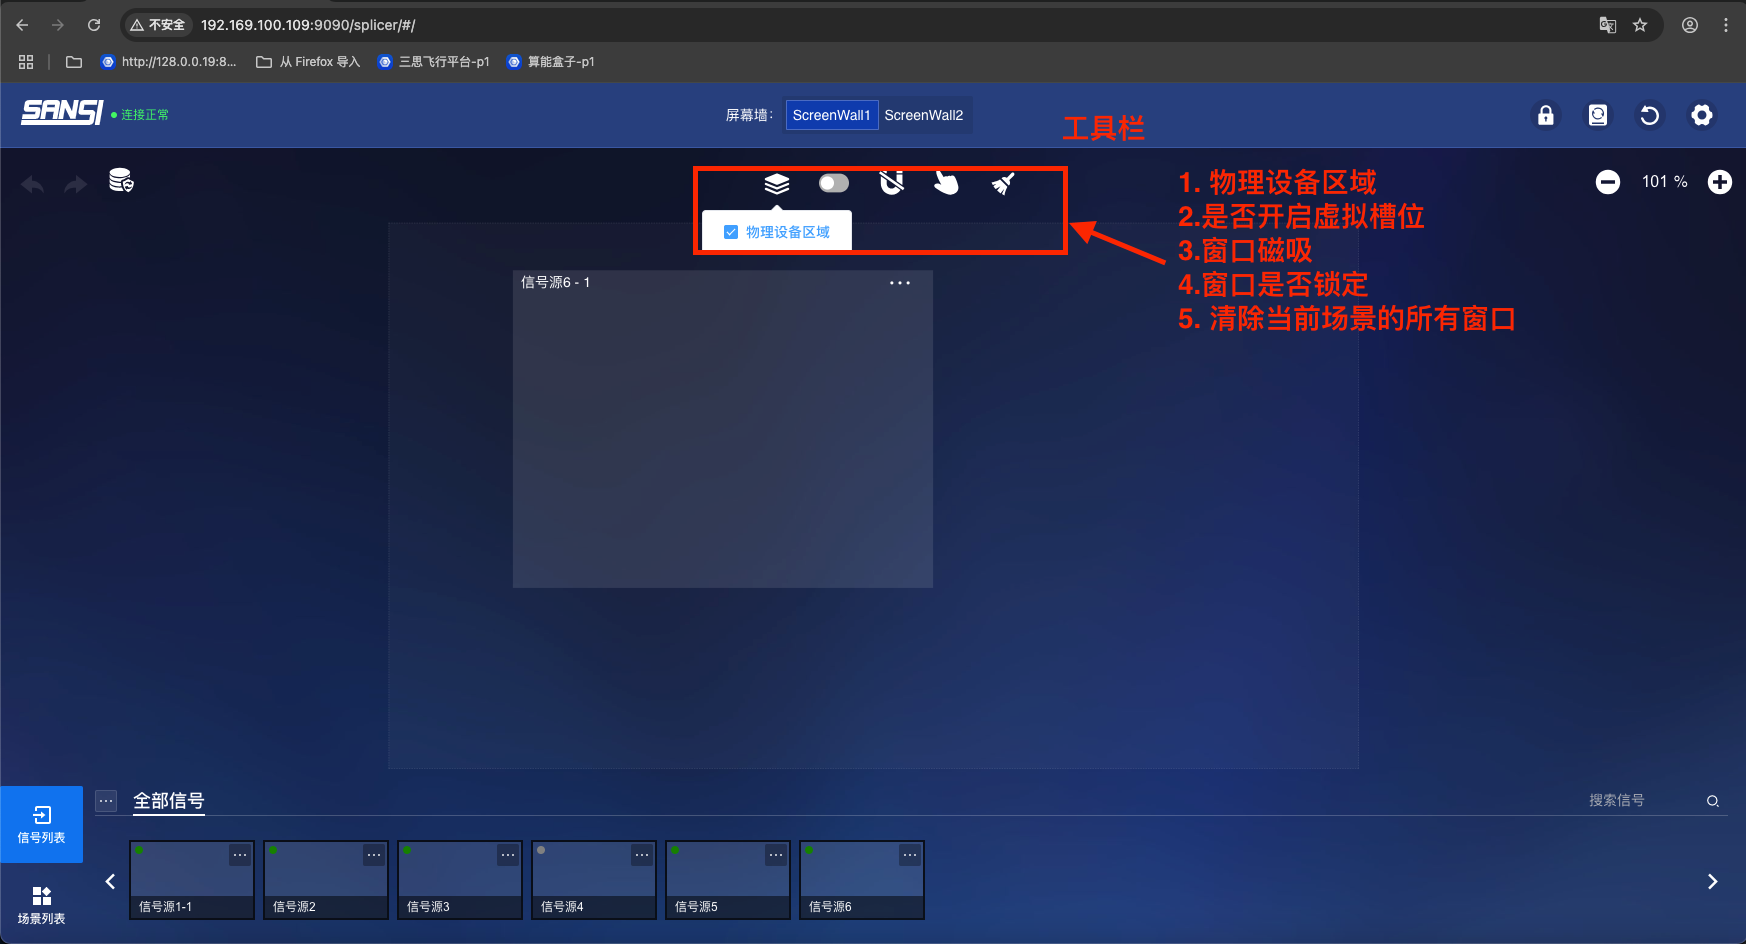
TIP
All the above tools can be configured to show or hide in the toolbar settings of [Page Configuration]
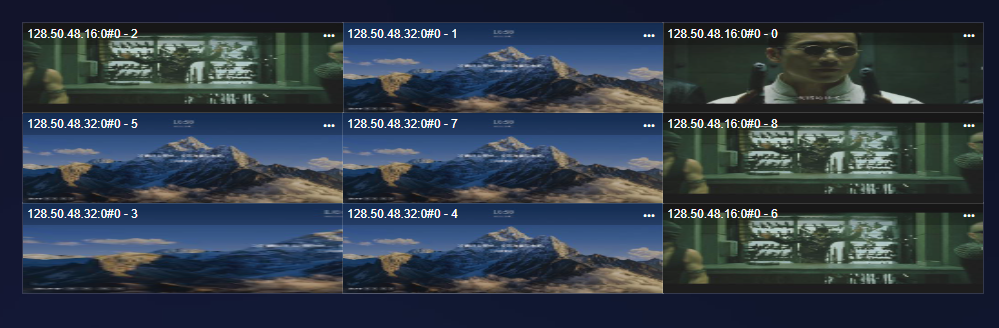
# 3.3 Screen Preview Area:
# 3.3.1 The screen preview area mainly displays the content shown on the selected large screen
- Preview画面 displayed on the large screen
- Signals displayed on the large screen
- Position information of signal windows on the large screen
Note
All the above layers can be switched through the [Layer Display] tool
# 3.4 Screen Signal Source Window List
# 3.4.1 Operations on signal source windows include:
- Move window position: Select a window, drag with the mouse to change its position. After stopping, the window information will be saved to the scene.
- Resize window: Select a window, then select the corner or edge of the window, drag the mouse, and the window size will change. The changed window information is saved to the scene.
- Window right-click menu: Send to back, Bring to front, Delete, Full screen, Adjust (popup layer to modify z, y, width, height).
- Double-click single window: Adjust the window size to match the slot size at the mouse click position.
- More window operations (three dots in the upper right corner of the window): Popup adjustment layer to modify z, y, width, height.
- Window deletion: When the window is dragged out of the screen area, it will be deleted (or right-click window - Delete).
Note
In tablet mode, long-press the window for 700ms to display the window right-click menu
# 4. Scenes
# 4.1 Switch to Scene List
Homepage -> Bottom of the page -> Click Scene List
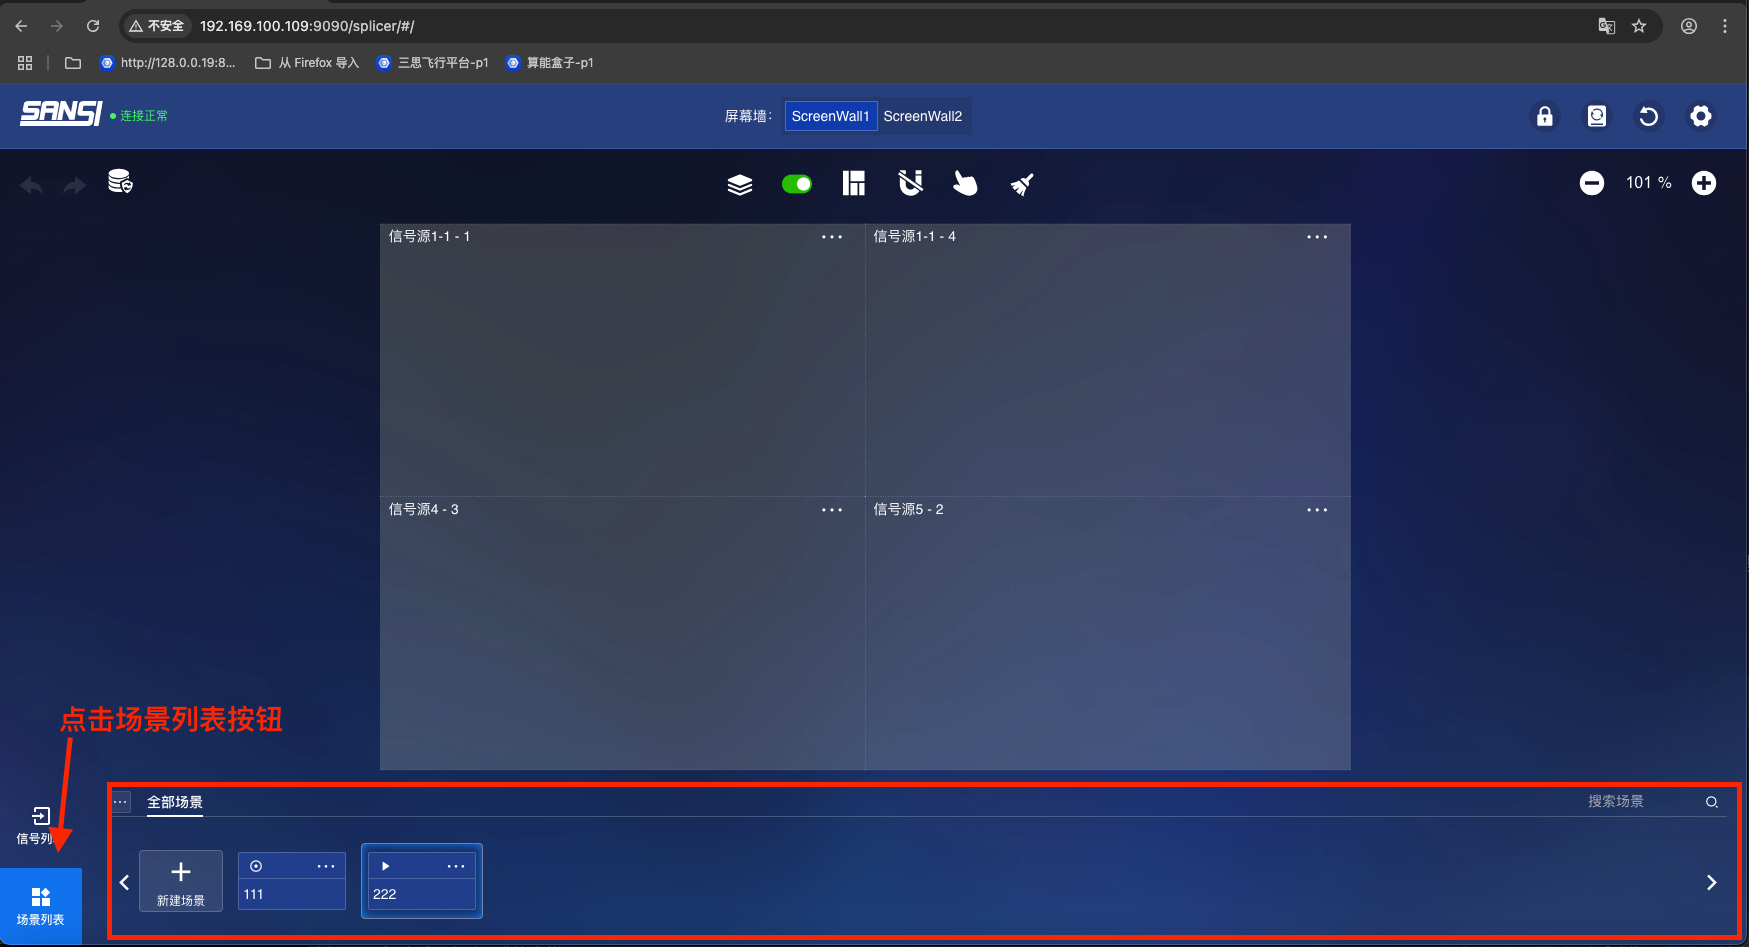
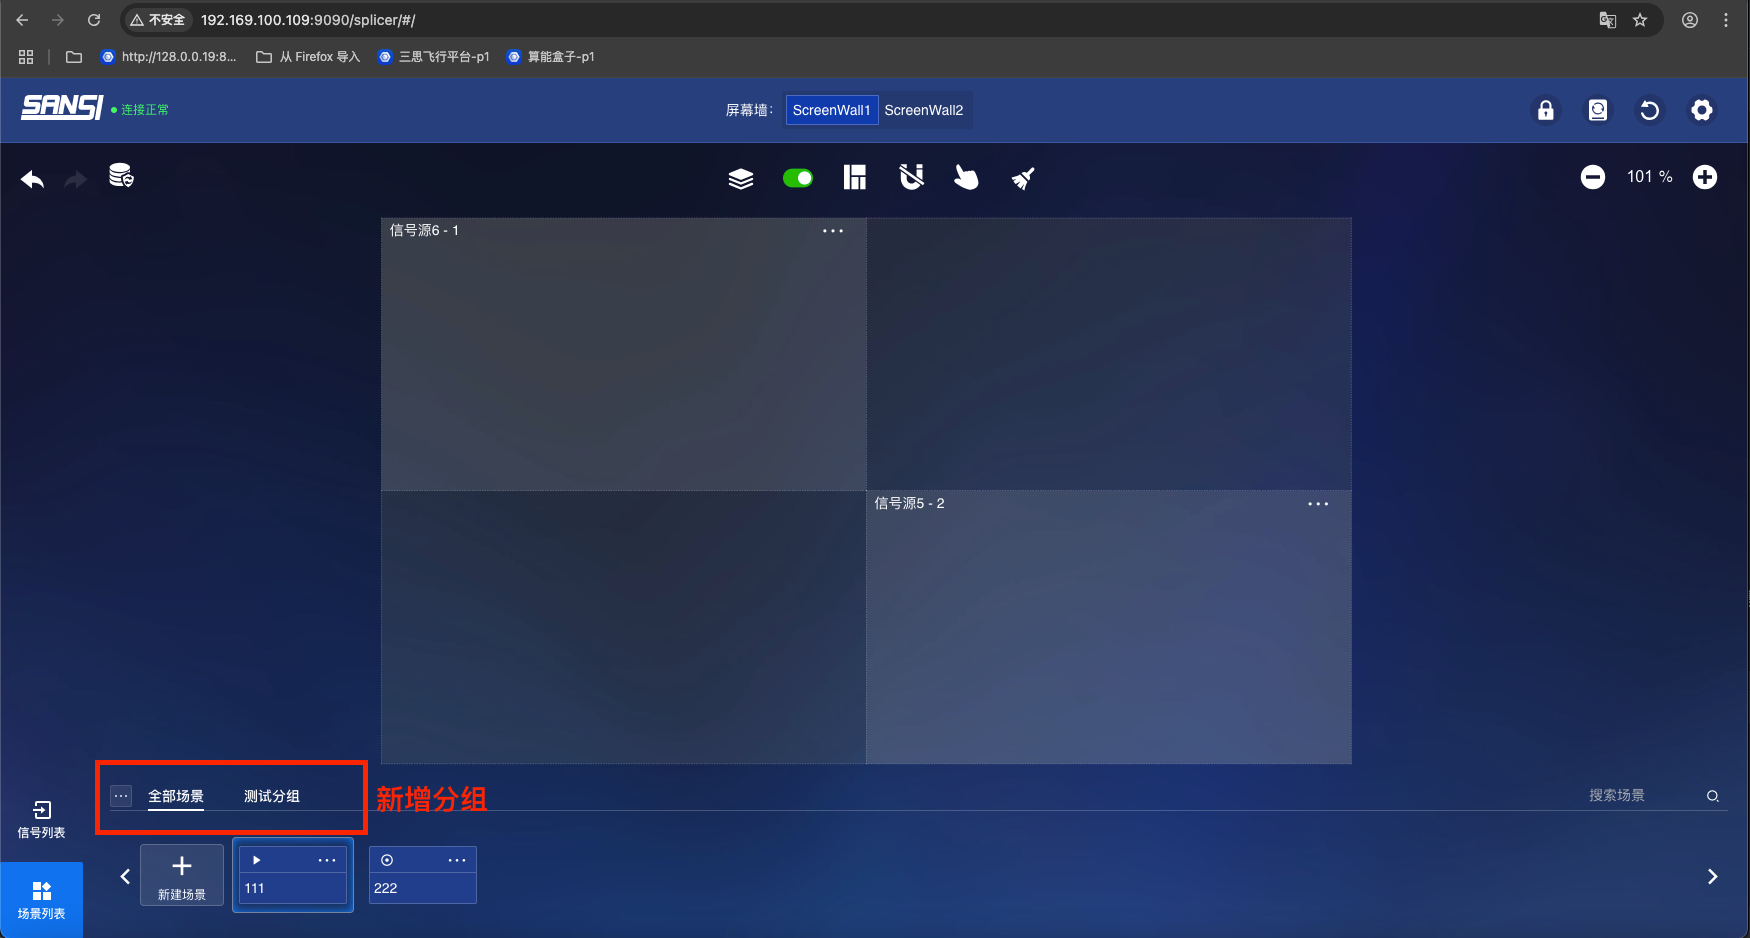
# 4.1 Scene Grouping
- Click the more button to add scene groups

- Add scene group: Click the add button, enter the group name, click confirm to add a new scene group.
- Scene group: Click the group name to switch to the corresponding scene group and display the scene list under the current group.
# 4.2 Scene List Functions Include:
Scene list pagination: When the number of scenes exceeds the browser display width, the next page will appear; otherwise, it will prompt: Current is the last page.
Scene search: Enter keywords, click the magnifying glass button behind the input box to search for scenes whose names contain the keywords in all scenes.
Add scene: Popup window, enter a new scene name, click confirm to add a new scene to the end of the scene list.
Scene item right-click menu: Move to top, Move to bottom, Rename, Delete.
Move to top: The scene will be sorted first.
Move to bottom: The scene will be sorted last.
Rename: Modify the name of the scene.
Delete: Delete the scene after secondary confirmation.
More scene operations: Same as right-click menu operations: Move to top, Move to bottom, Rename, Delete.
Scene switching: Click a scene to update the slots and windows in the screen preview area.
Note
Scene list: The display position can be modified to float right through the page layout in [Page Configuration] function, with the same functionality.
# 5. Signal Source List
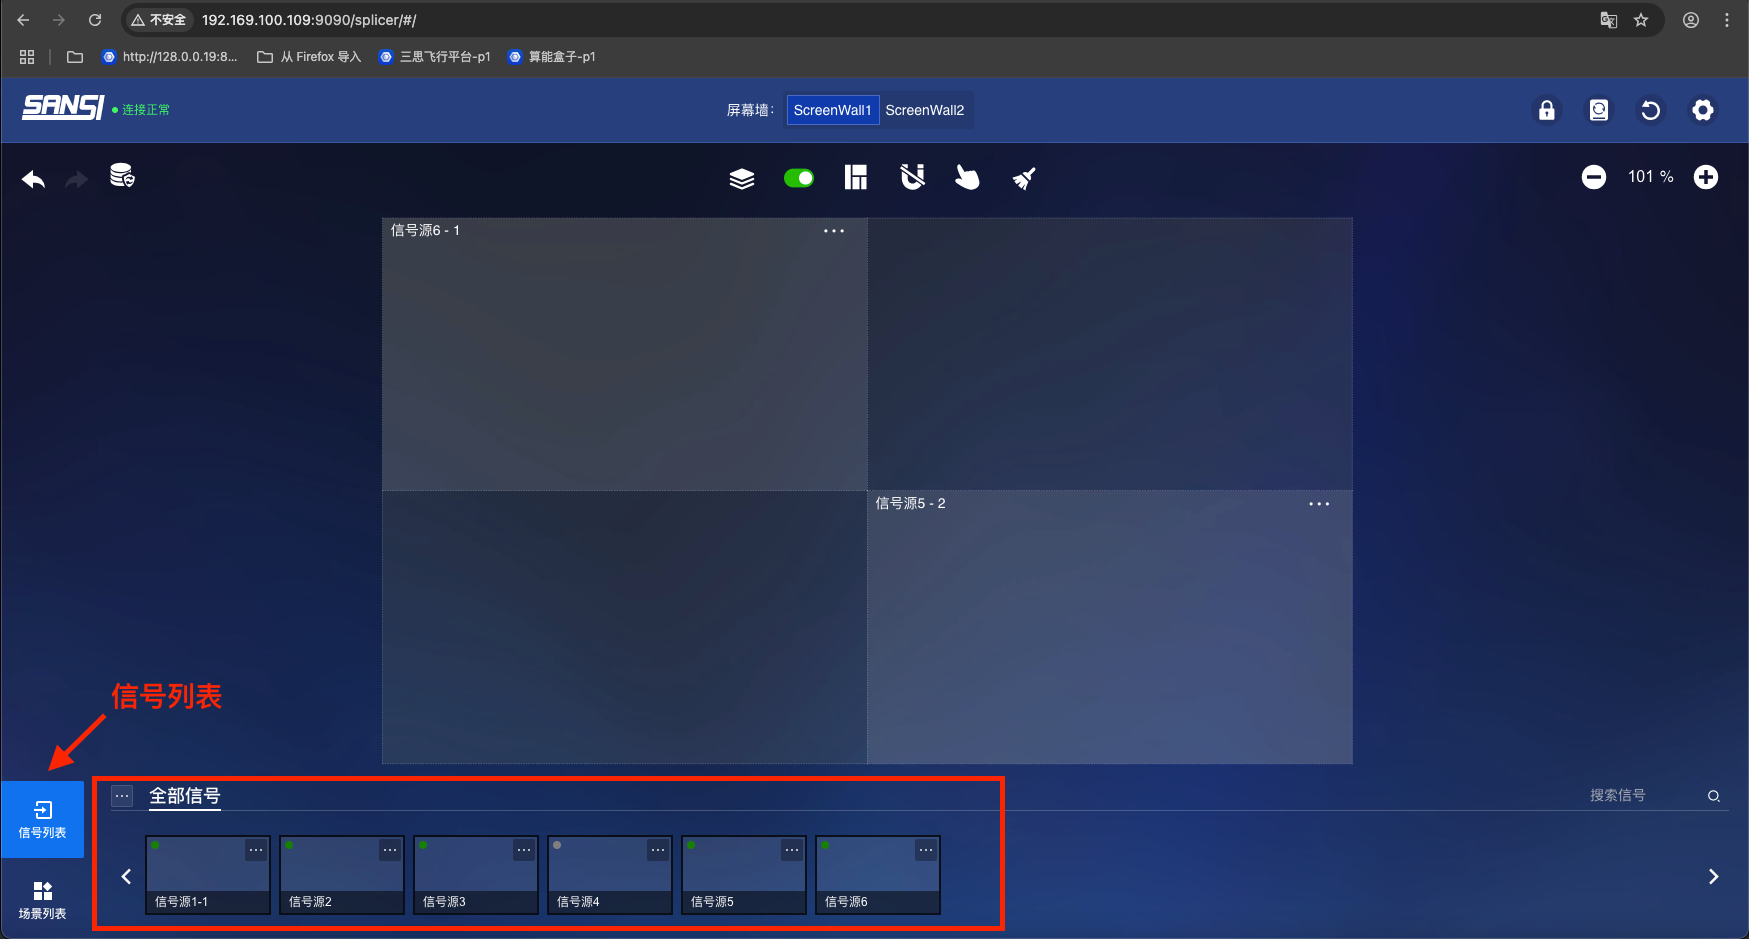
# 5.1 Page Location:
Homepage -> Bottom of the page.
# 5.2 Signal Source List Functions Include:
- Signal source list pagination: When the number of signal sources exceeds the browser display width, the next page will appear; otherwise, it will prompt: Current is the last page.
- Signal source search: Enter keywords, click the magnifying glass button behind the input box to search for signal sources whose names contain the keywords in all signal sources.
- Signal source renaming: Click the signal source name, enter a new name, and when the cursor leaves, the new name will be saved, and the signal source list and window will be refreshed simultaneously.
- Signal source grouping: There are grouping tags above the signal source list. Click to switch to the corresponding group and display the signal source list in that group.
- Signal source right-click menu: Add to group, Create and add to group.
- Add to group: Click to popup a window displaying all group lists. After checking and confirming, the signal source can be added to the group. If unchecked, the signal source will be removed from the group. The group list supports editing, deleting and adding groups.
- Create and add to group: A quick way to add to a new group. Click to popup a window, enter a new group name, confirm to add a new group and add the signal source to the group.
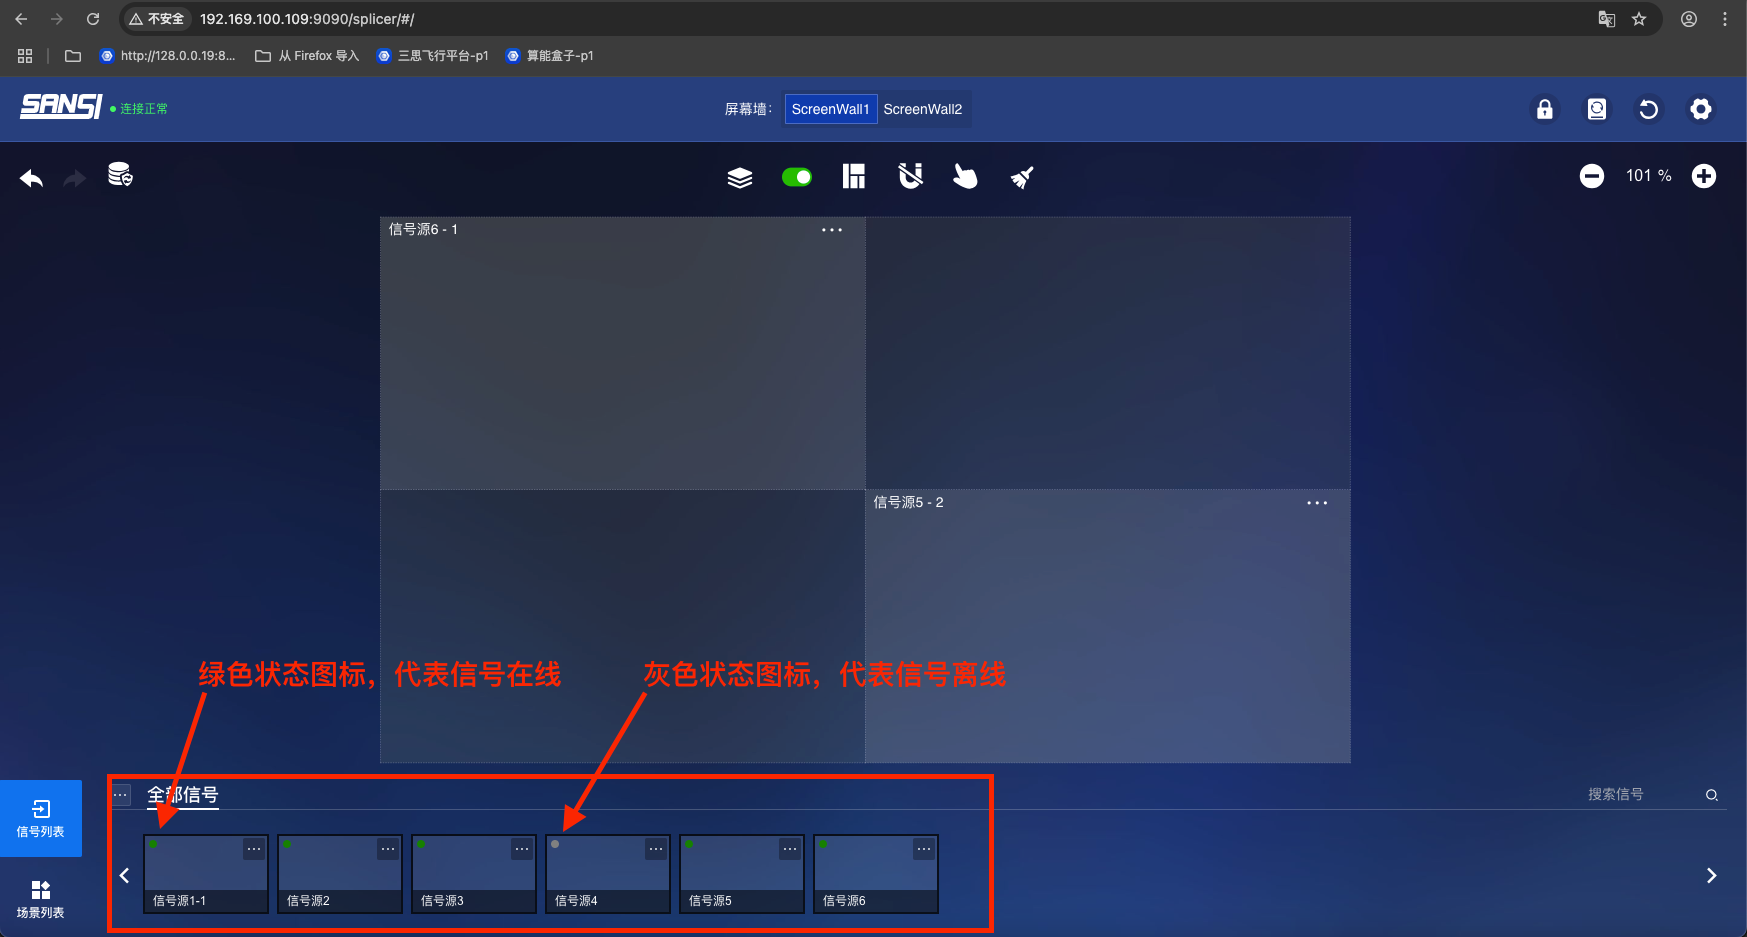
- Signal source online status display: Green for online, Gray for offline
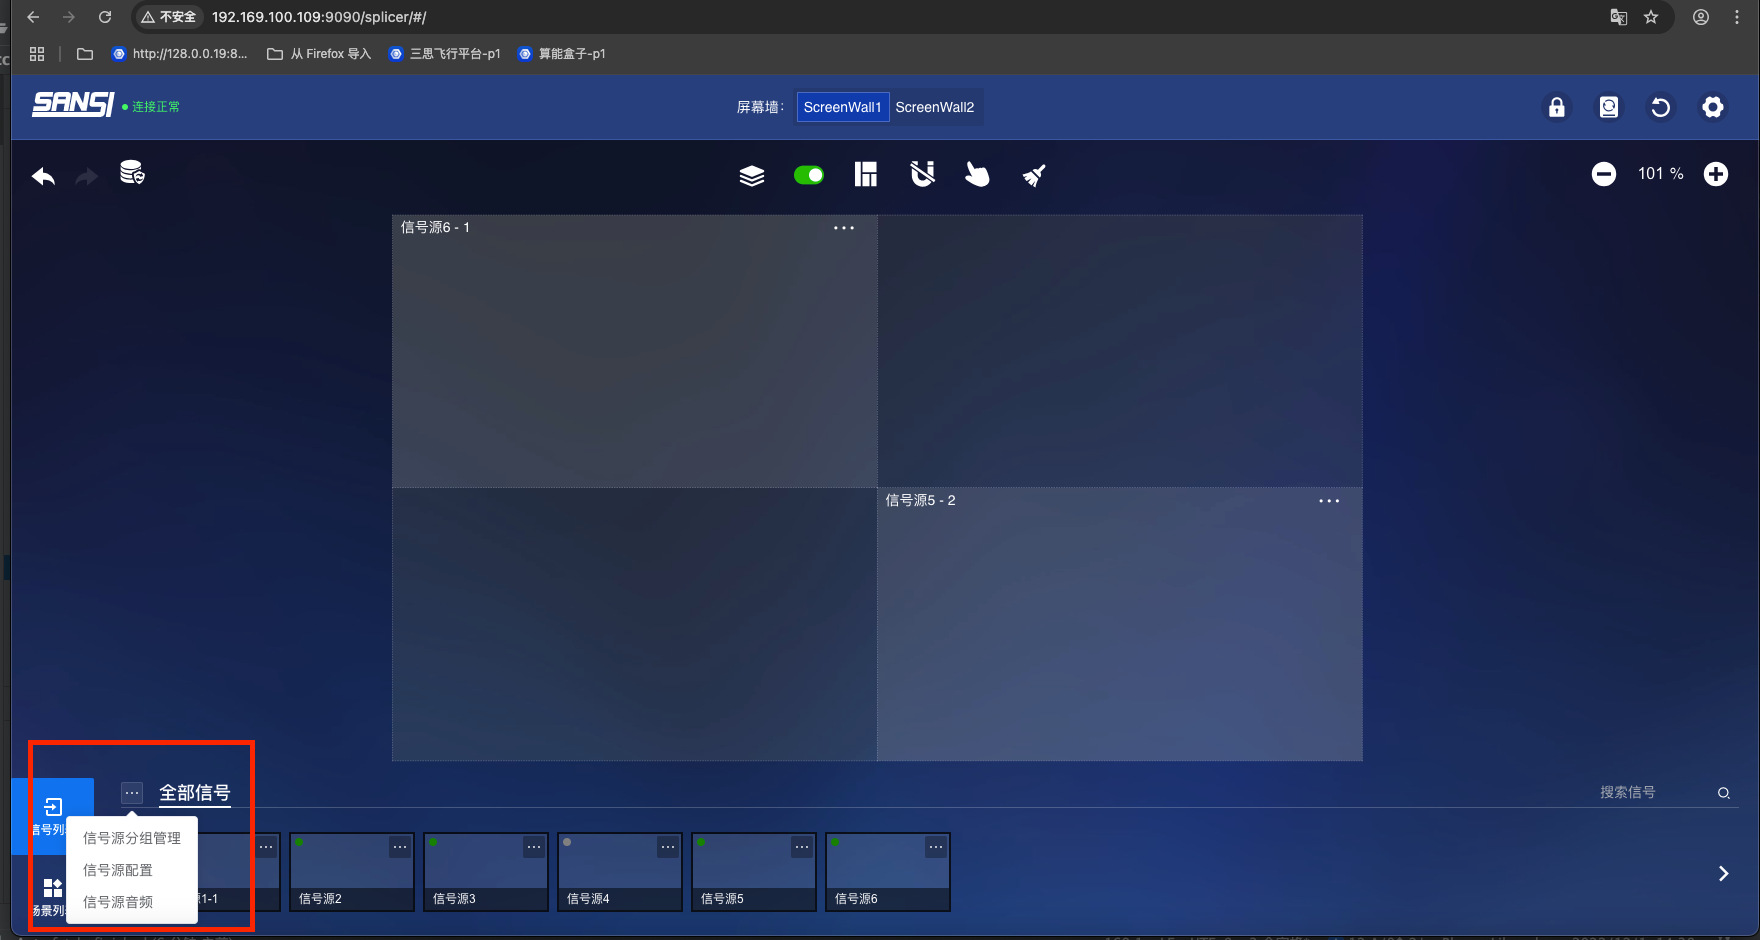
- More buttons: Signal source group management, Signal source configuration, Signal source audio configuration
- Signal source group management: Click to popup a window displaying all group lists. After checking and confirming, the signal source can be added to the group. If unchecked, the signal source will be removed from the group. The group list supports editing, deleting and adding groups.
- Signal source configuration: Configure signal name, signal type, IP, port number
- Signal source audio configuration: Configure signal audio input/output, binding to signal source, sound mode, etc.
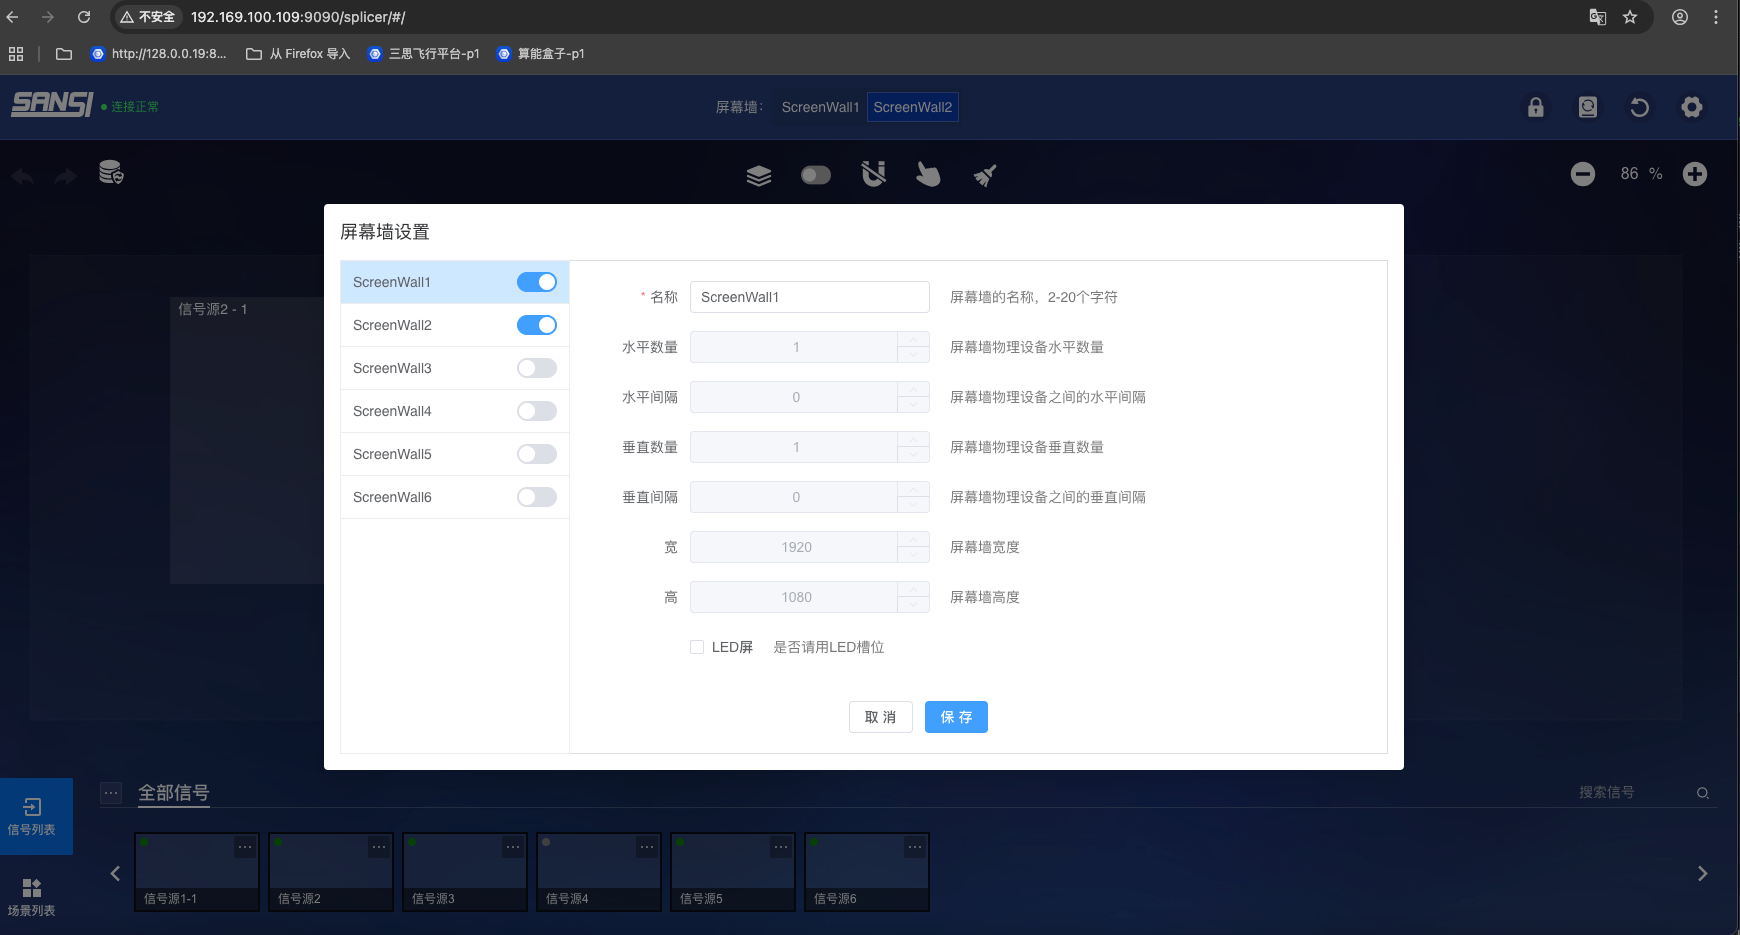
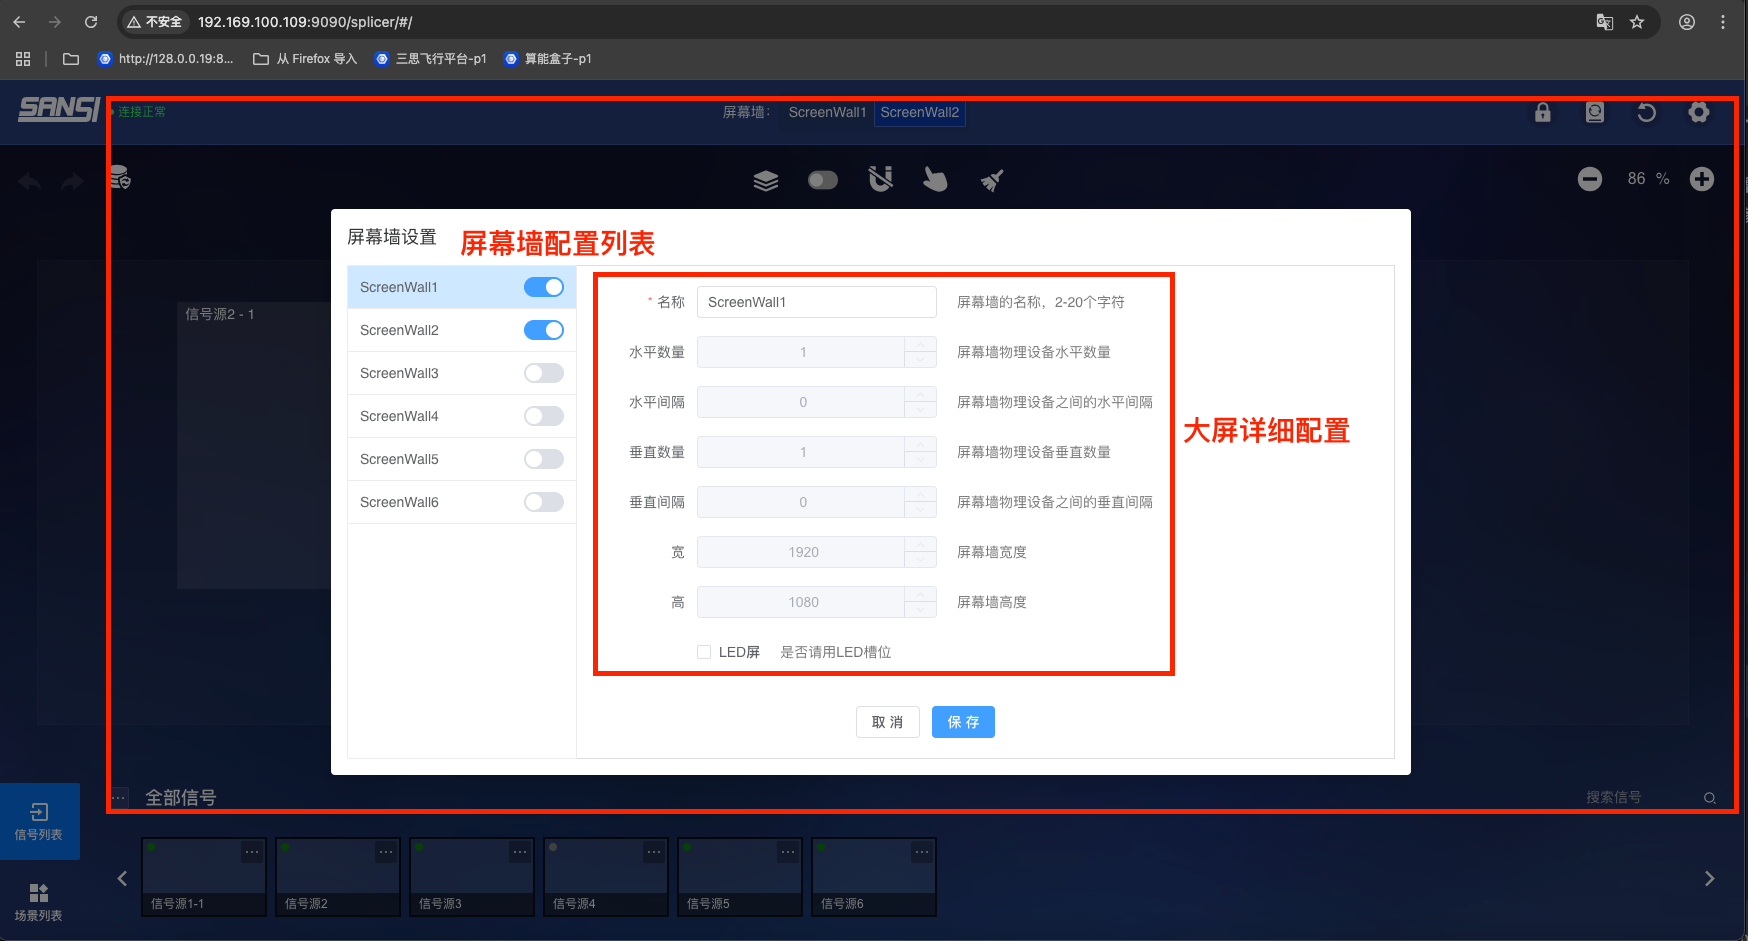
# 6. Screen Wall Configuration
# 6.1 Preview Image:
# 6.2 Access Path:
{protocol}😕/{host}:{port}/#/splicerConfig
# 6.3 Opening Method:
Click the configuration icon in the upper right corner -> Open settings -> Click [Screen Wall Configuration] -> Enter the page.
# 6.4 Screen Wall Configuration Page Functions:
- Current screen wall list
- Activate screen wall: Turn on the screen wall enable button. After activation, the screen wall will be displayed in the screen wall list
- Modify screen wall name
- Horizontal column setting
- Horizontal spacing setting
- Vertical row setting
- Vertical spacing setting
- Large screen width setting
- Large screen height setting
- LED screen setting
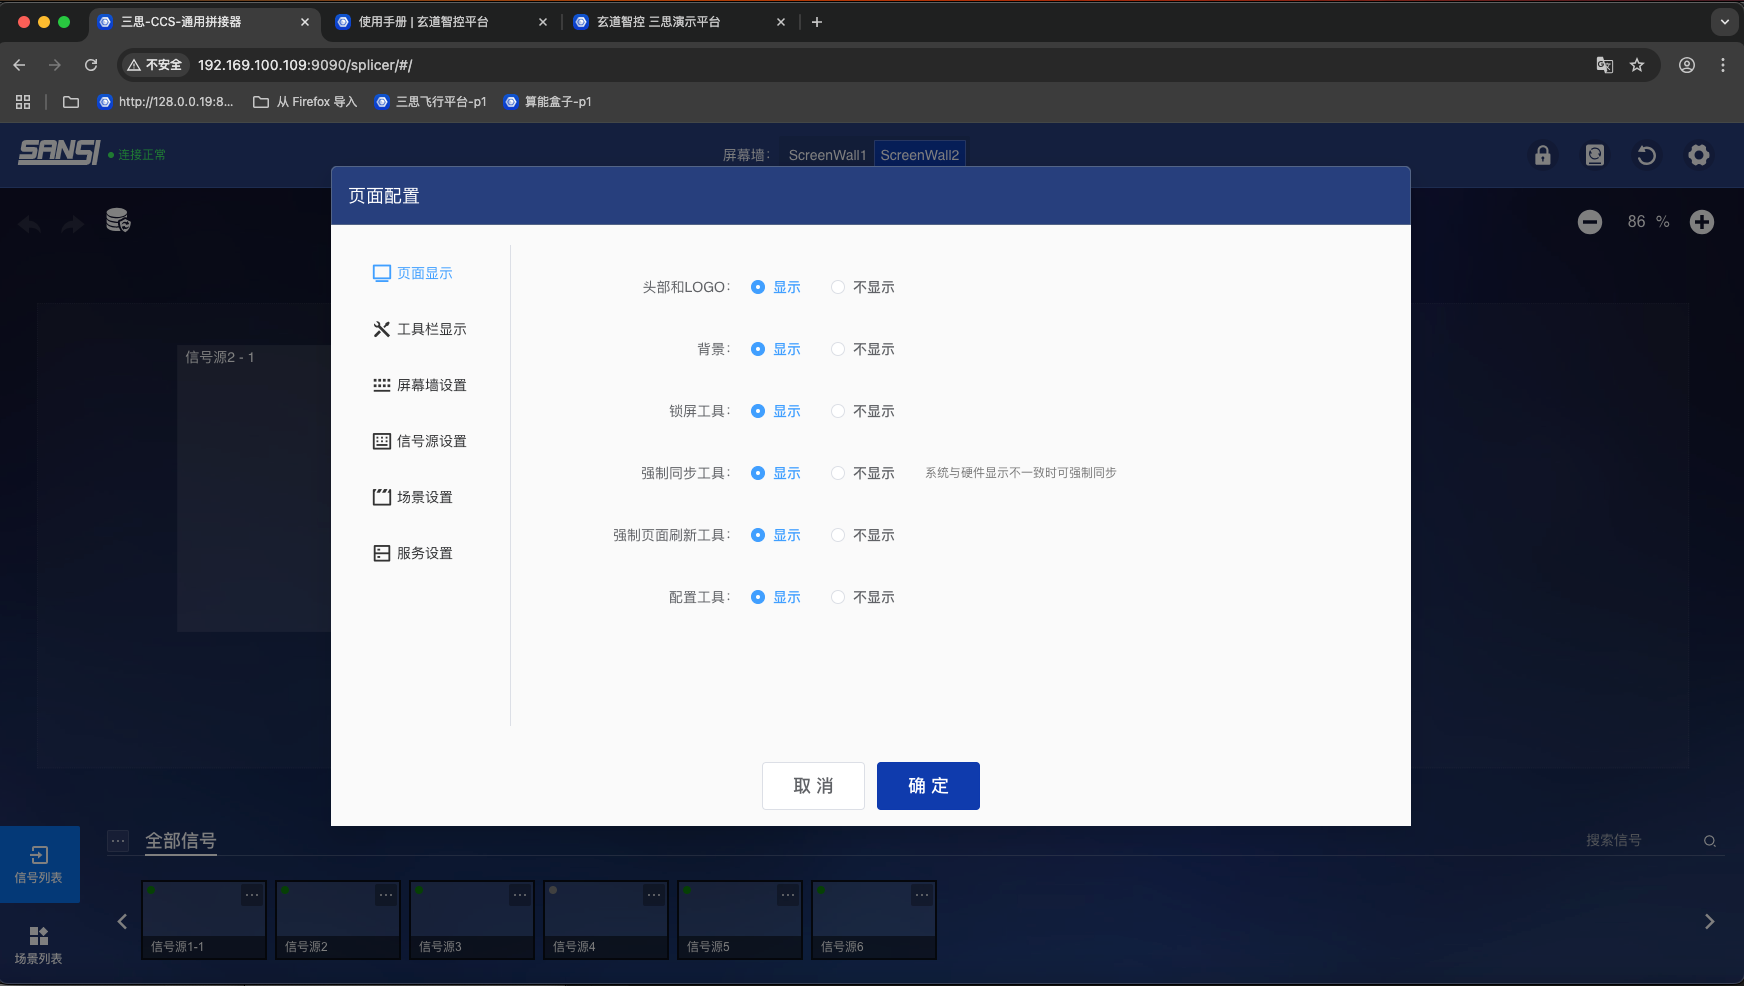
# 7. Page Configuration
# 7.1 Opening Method:
Click the configuration icon in the upper right corner -> Open settings -> Click [Page Configuration] -> Open popup window.
# 7.2 Page Settings
- Page Header and logo: Show or hide the header and logo on the page. Purpose: When embedded in the universal control system, if there is a common header, the system header can be hidden.
- Background display: Display project background when embedding iframe web pages
- Lock screen tool display: Whether to display the lock screen function
- Forced synchronization tool display: Whether to display the forced synchronization tool in the main page, which synchronizes system software and hardware data
- Forced page refresh display
- Configuration tool display
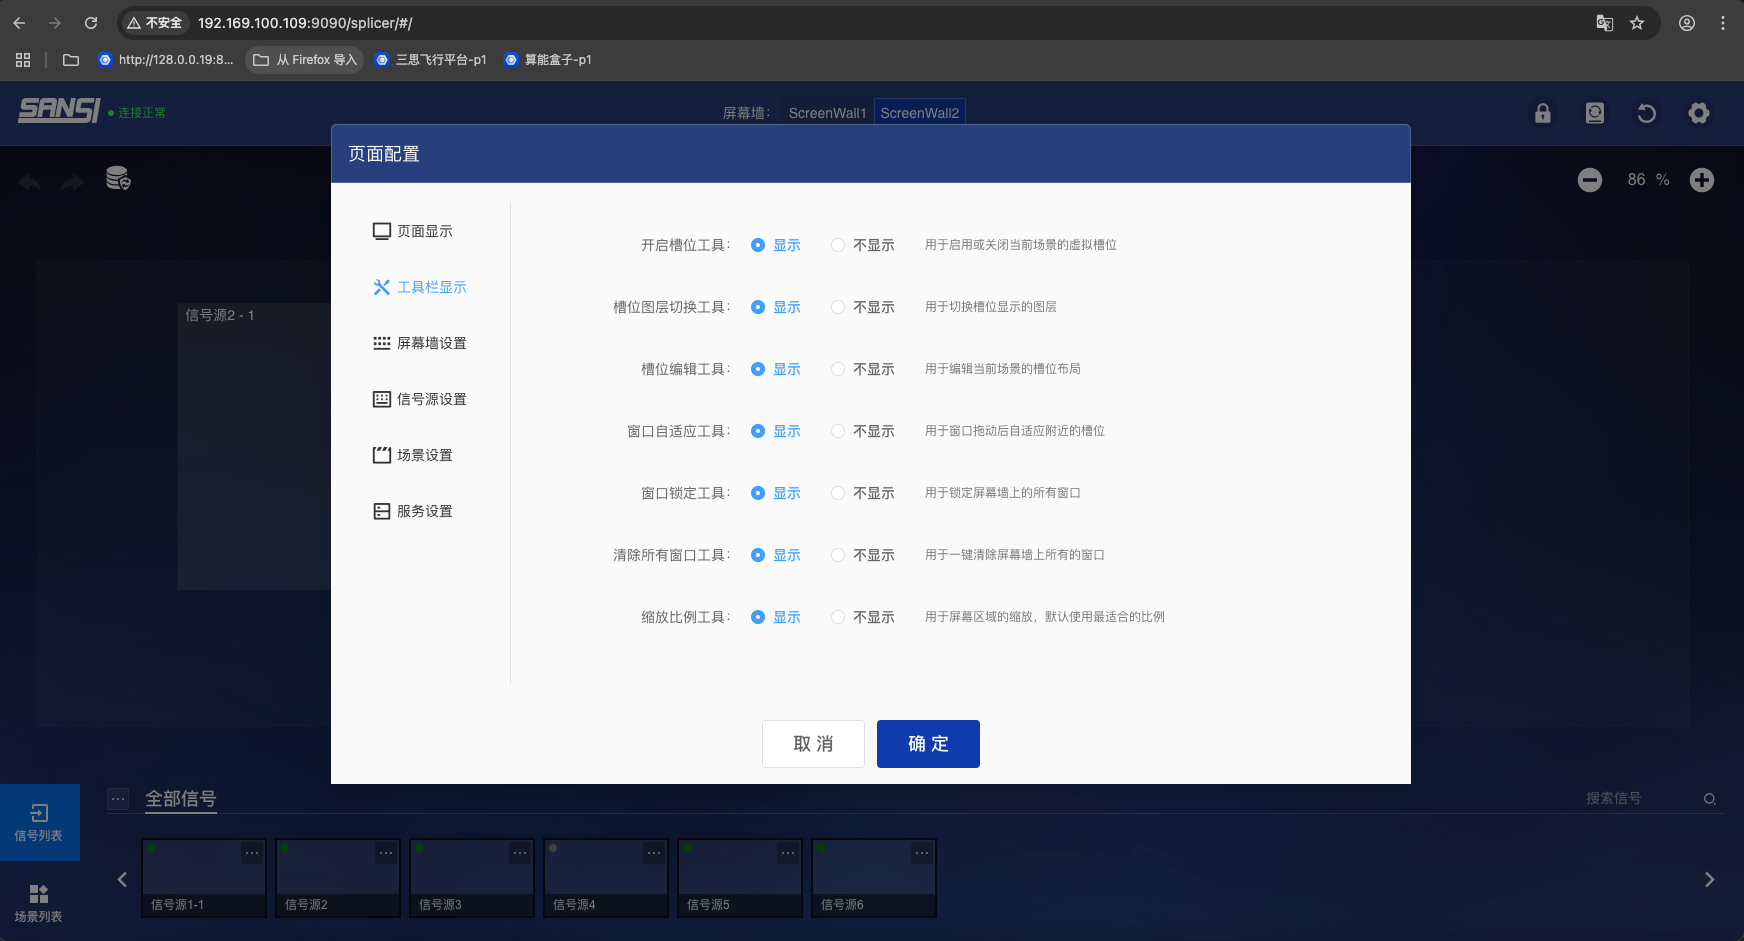
# 7.3 Configurable Items in Page Configuration Popup Window
- Slot tool enable: Whether to enable logical slots
- Slot layer switching tool: Used to switch slot layers
- Slot editing tool: Used to edit the slot layout of the current scene
- Window adaptation tool: Used for window to adapt to nearby slots after dragging
- Window lock tool: Used to control whether the window can be dragged
- Clear all windows tool display
- Zoom ratio tool: Used to zoom the screen to provide a suitable display ratio for users
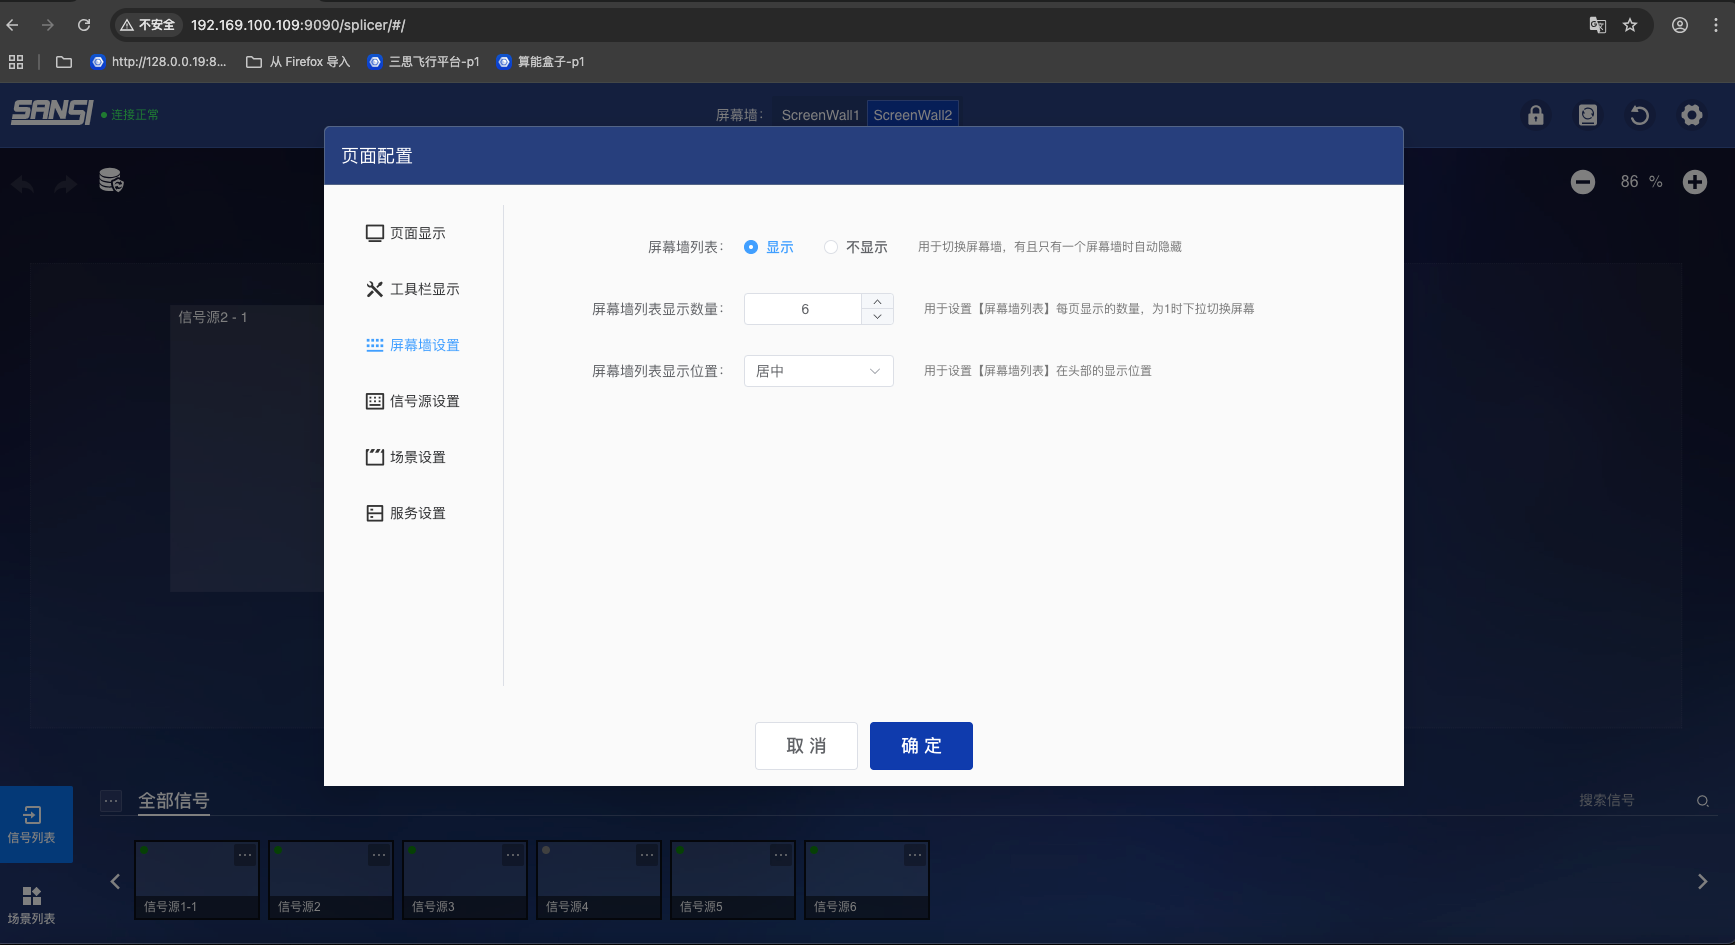
# 7.4 Screen Wall Settings
- Screen wall list display: Whether to display the screen wall list to users
- Screen wall list count display: Whether to display the number of screen walls to users
- Screen wall list display position: Used to set the display position of the screen wall list, center, left, right
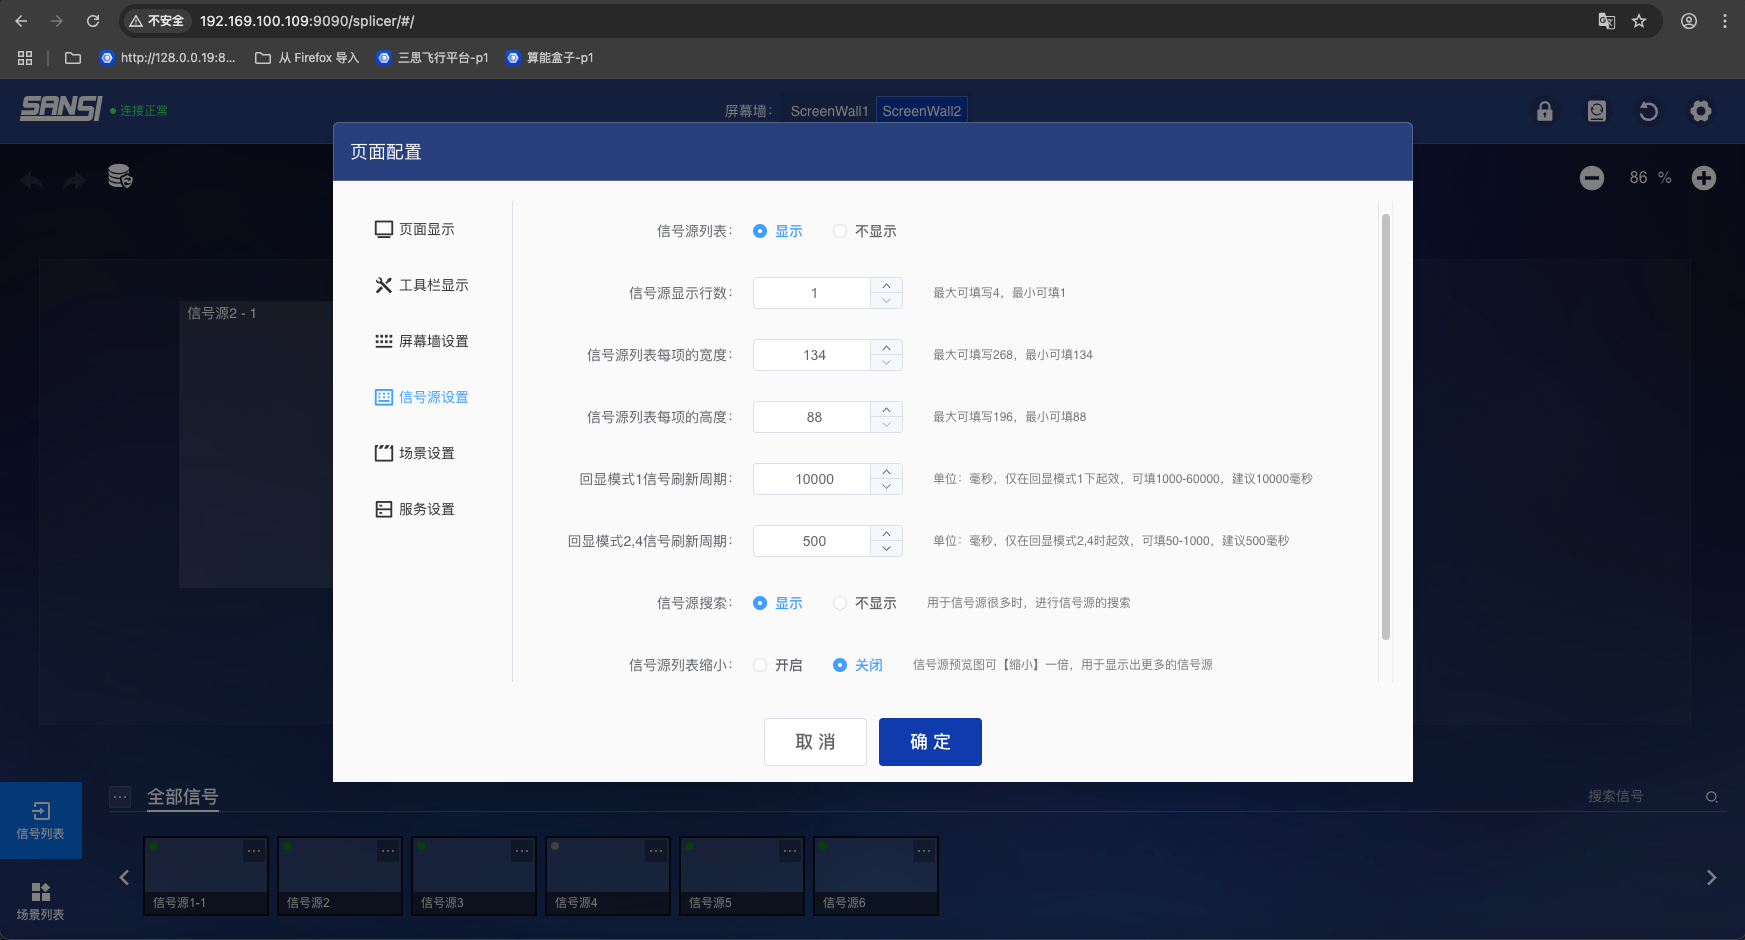
# 7.5 Signal Source Settings
- Signal source list display: Whether to display the signal source list to users
- Signal source display rows: Used to set the number of display rows of the signal source list
- Signal source display width setting
- Signal source display height setting
- Echo mode 1 picture refresh time cycle
- Echo mode 2, 4 pictures refresh time cycle
- Signal source search display
- Signal source list search enable
# 7.6 Scene Settings
- Auto-save scene changes
- Current scene display in toolbar
- Scene list in signal source area: Whether to display signal source list and scene list to users
- Upper and lower scene switching display
- Current scene history: Whether to display historical scene data for scene recovery
- Scene settings display
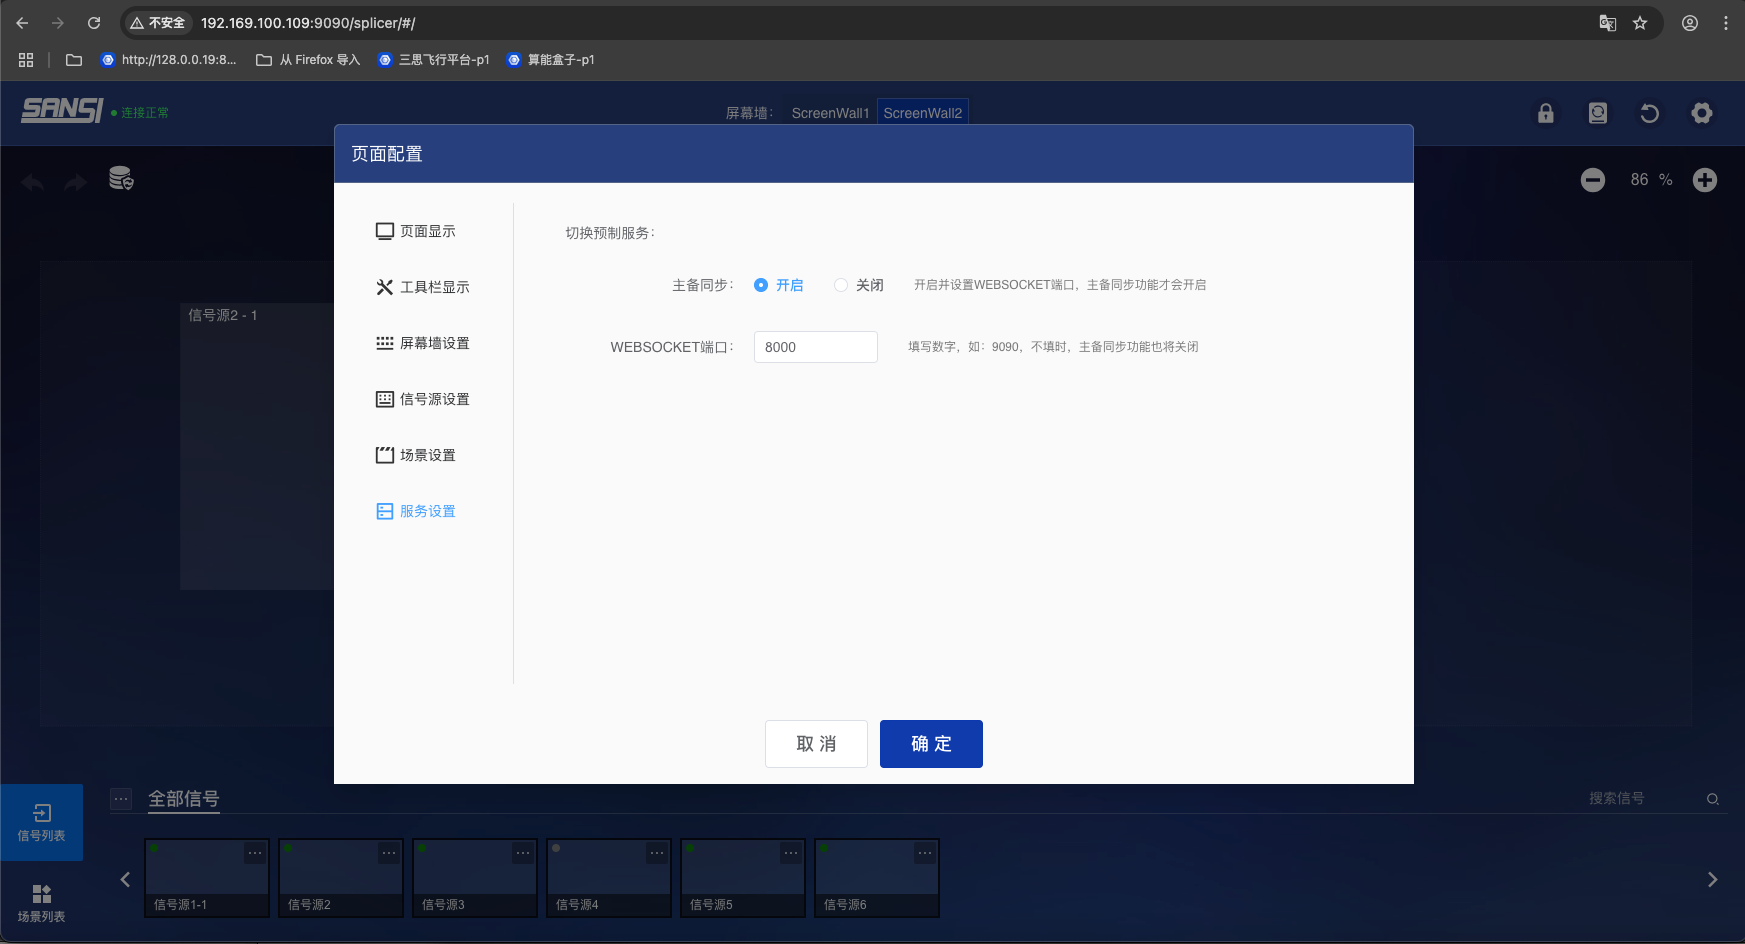
# 7.7 Service Settings
- Master-slave switch: Used to enable master-slave synchronization function
- WebSocket service address: Used to set WebSocket service address
# 8. Scene Logical Slot Editing
# 8.1 Opening Method
Screen preview area -> Enable logical slot button
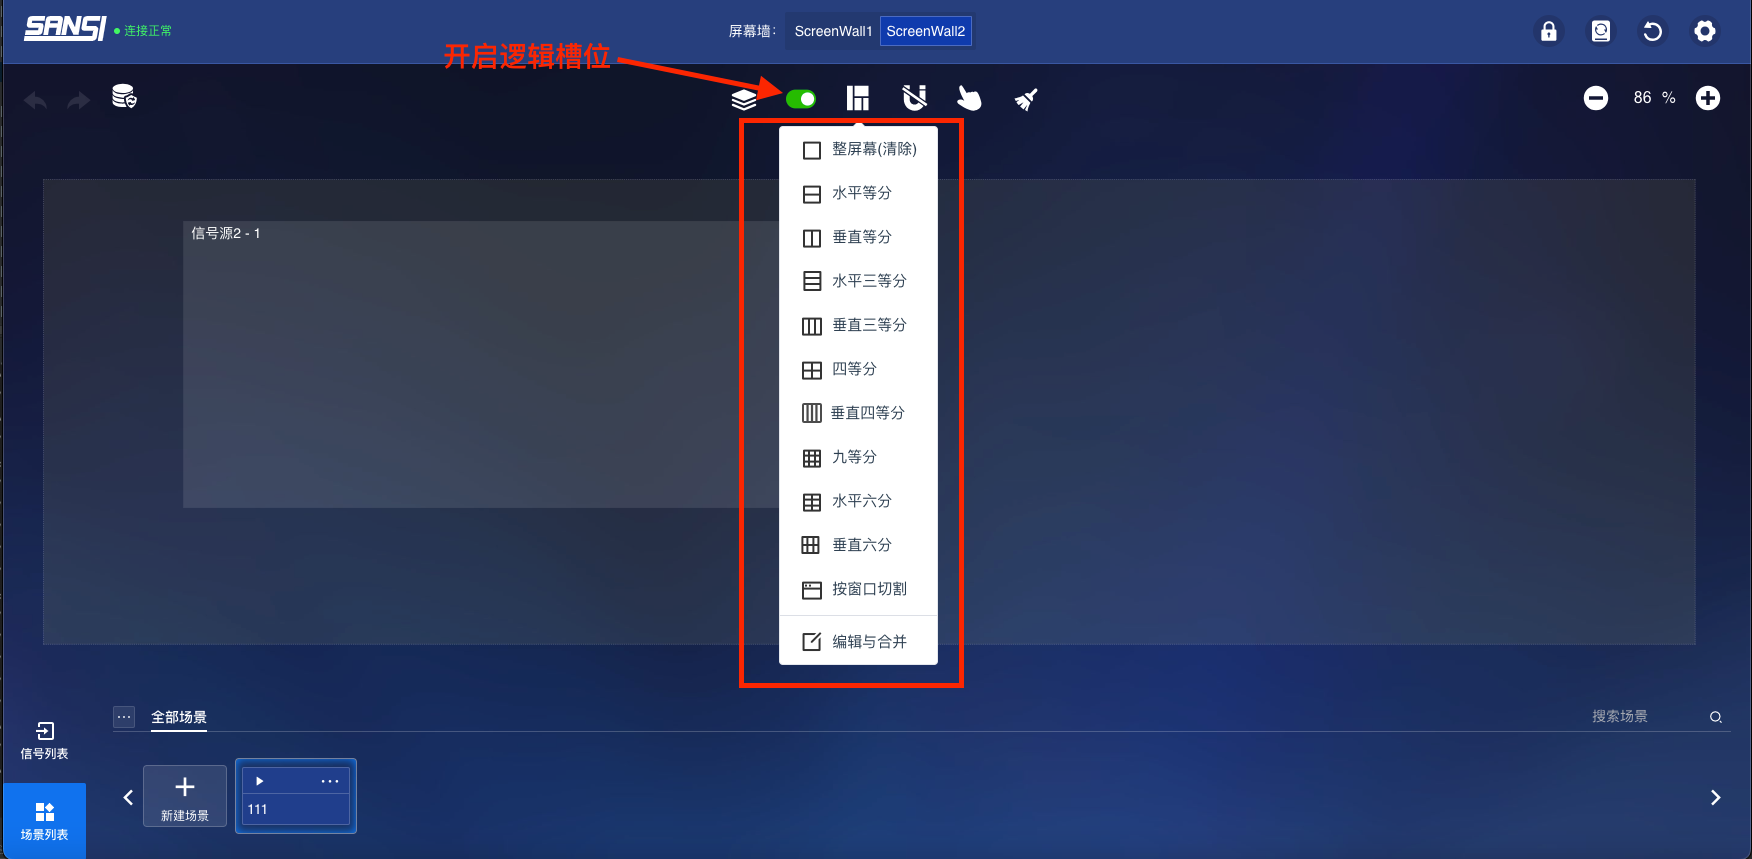
# 8.2 Logical Slot Quick Editing
- Entire screen: Turn the screen into an integrated area
- Horizontal split: Split the screen into 2 equal parts horizontally
- Vertical split: Split the screen into 2 equal parts vertically
- Horizontal 3-split: Split the screen into 3 equal parts horizontally
- Vertical 3-split: Split the screen into 3 equal parts vertically
- Four-split: Split the screen into 2x2 equal parts
- Vertical 4-split: Split the screen into 4 equal parts vertically
- Nine-split: Split the screen into 3x3 equal parts
- Horizontal 6-split: Split the screen into 6 equal parts horizontally
- Vertical 6-split: Split the screen into 6 equal parts vertically
- Split by window: Intelligently split the screen according to current windows
- Edit and merge: Custom split the screen wall according to any rules
# 9. Project Deployment and Configuration
# 9.1 Deployment in Hulk Service:
After deploying the Hulk service, the splicer control system is carried by default. The configuration of the splicer control system is also set by default and does not need to be modified.
Recommended
Just enable and configure the Hulk service without modifying the configuration of the splicer control system
# 9.1 Deploy to Project Using Splicer Plugin (Recommended Method)
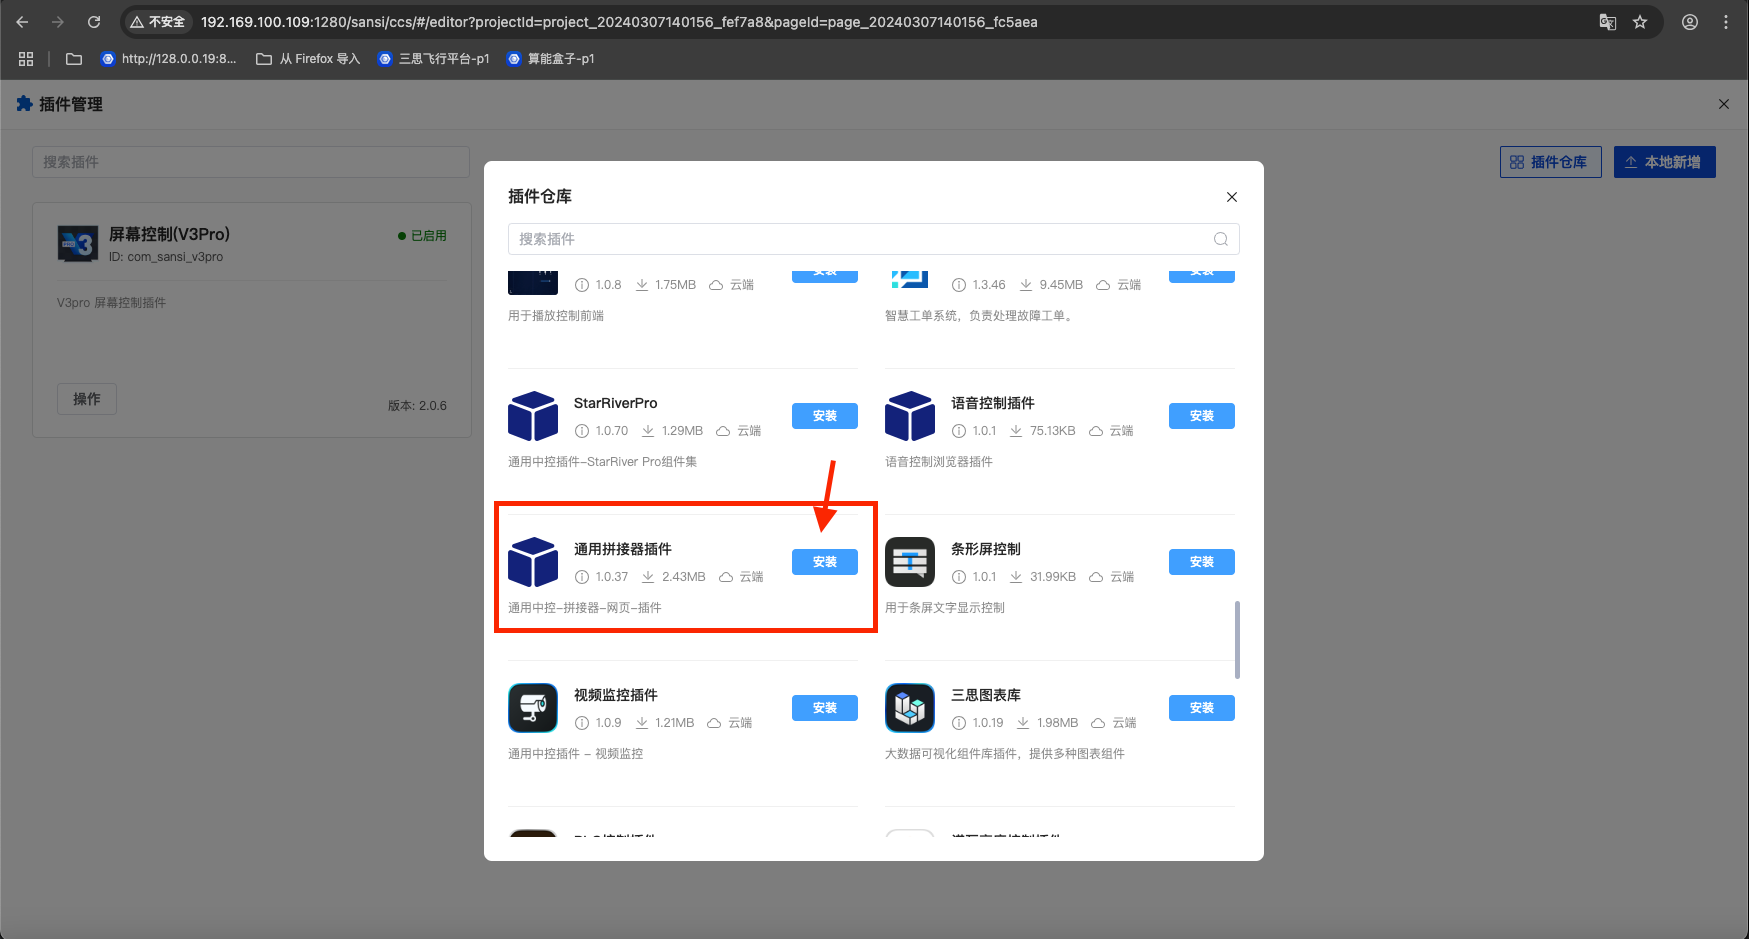
- Enter the CyberHub project, click Project Settings -> Plugin Management -> Click Splicer Plugin -> Click Install
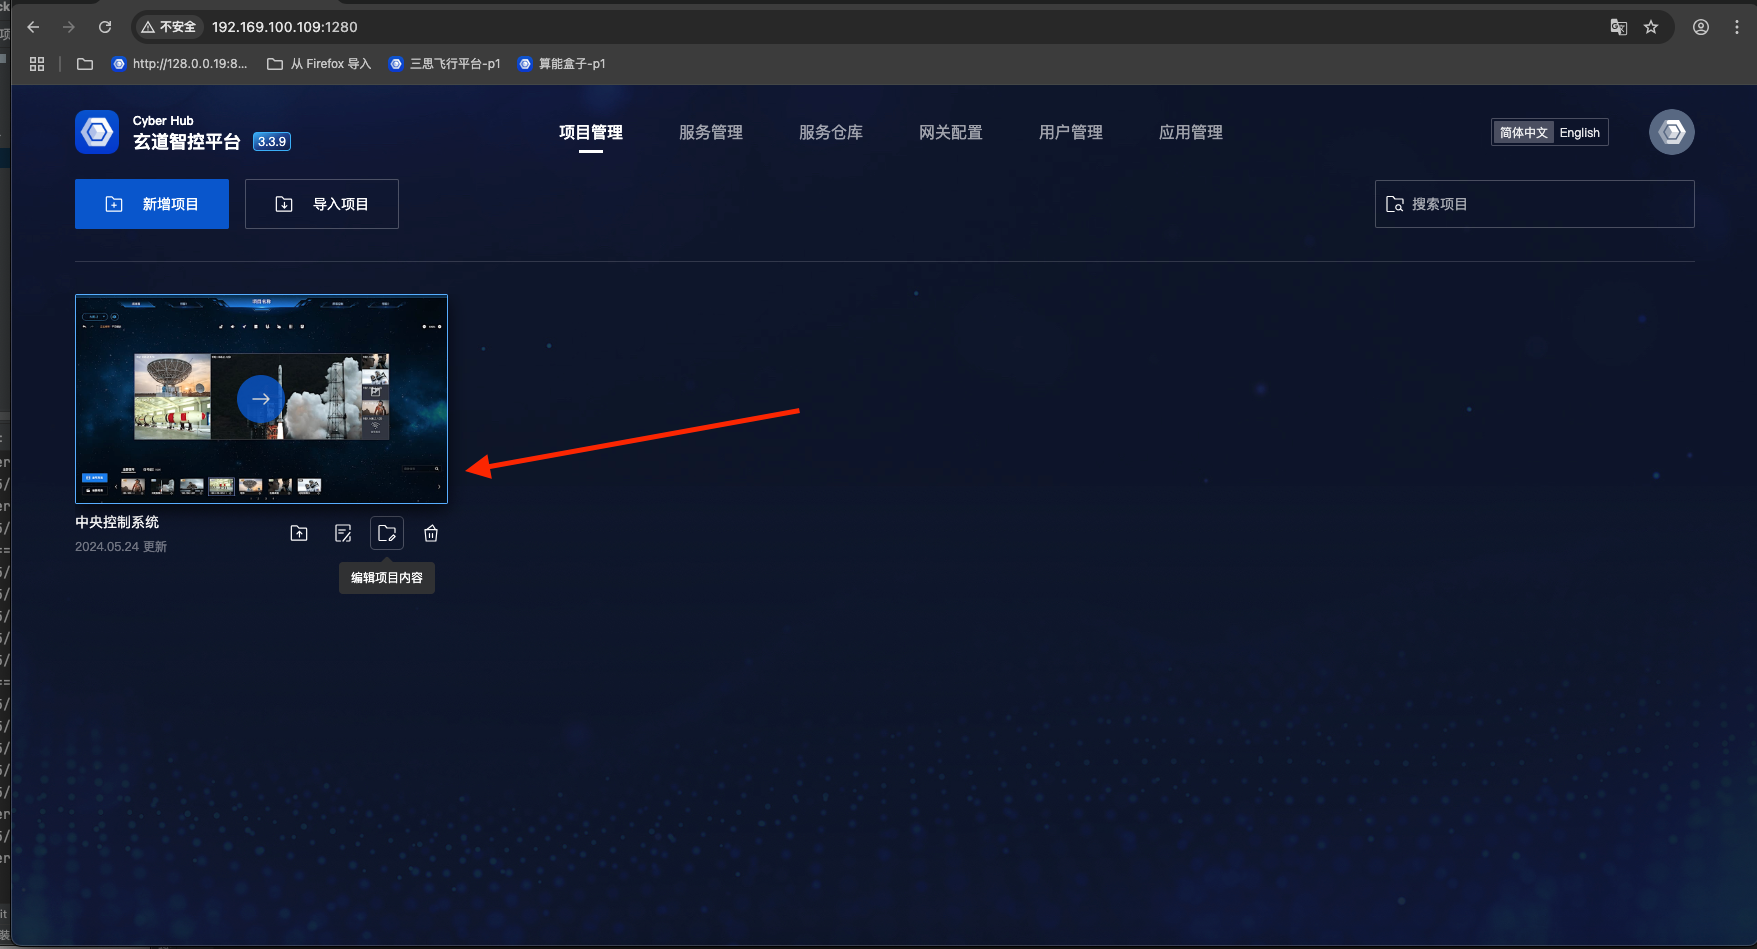
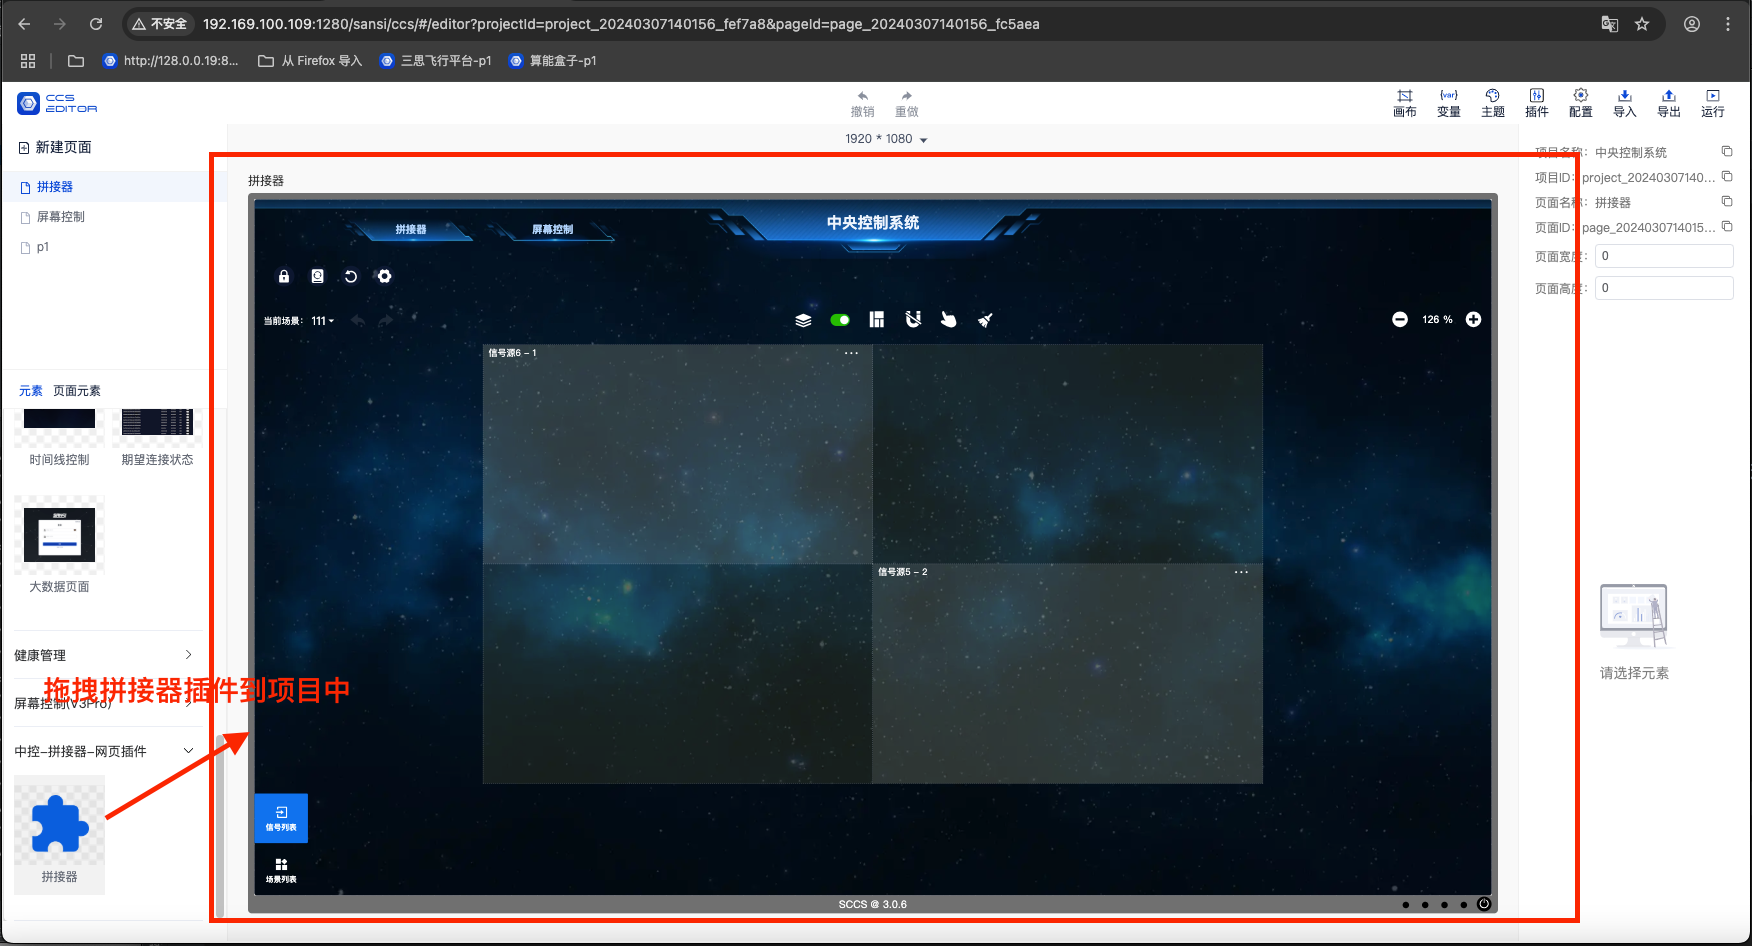
- Enter the project, drag a splicer plugin page into the project
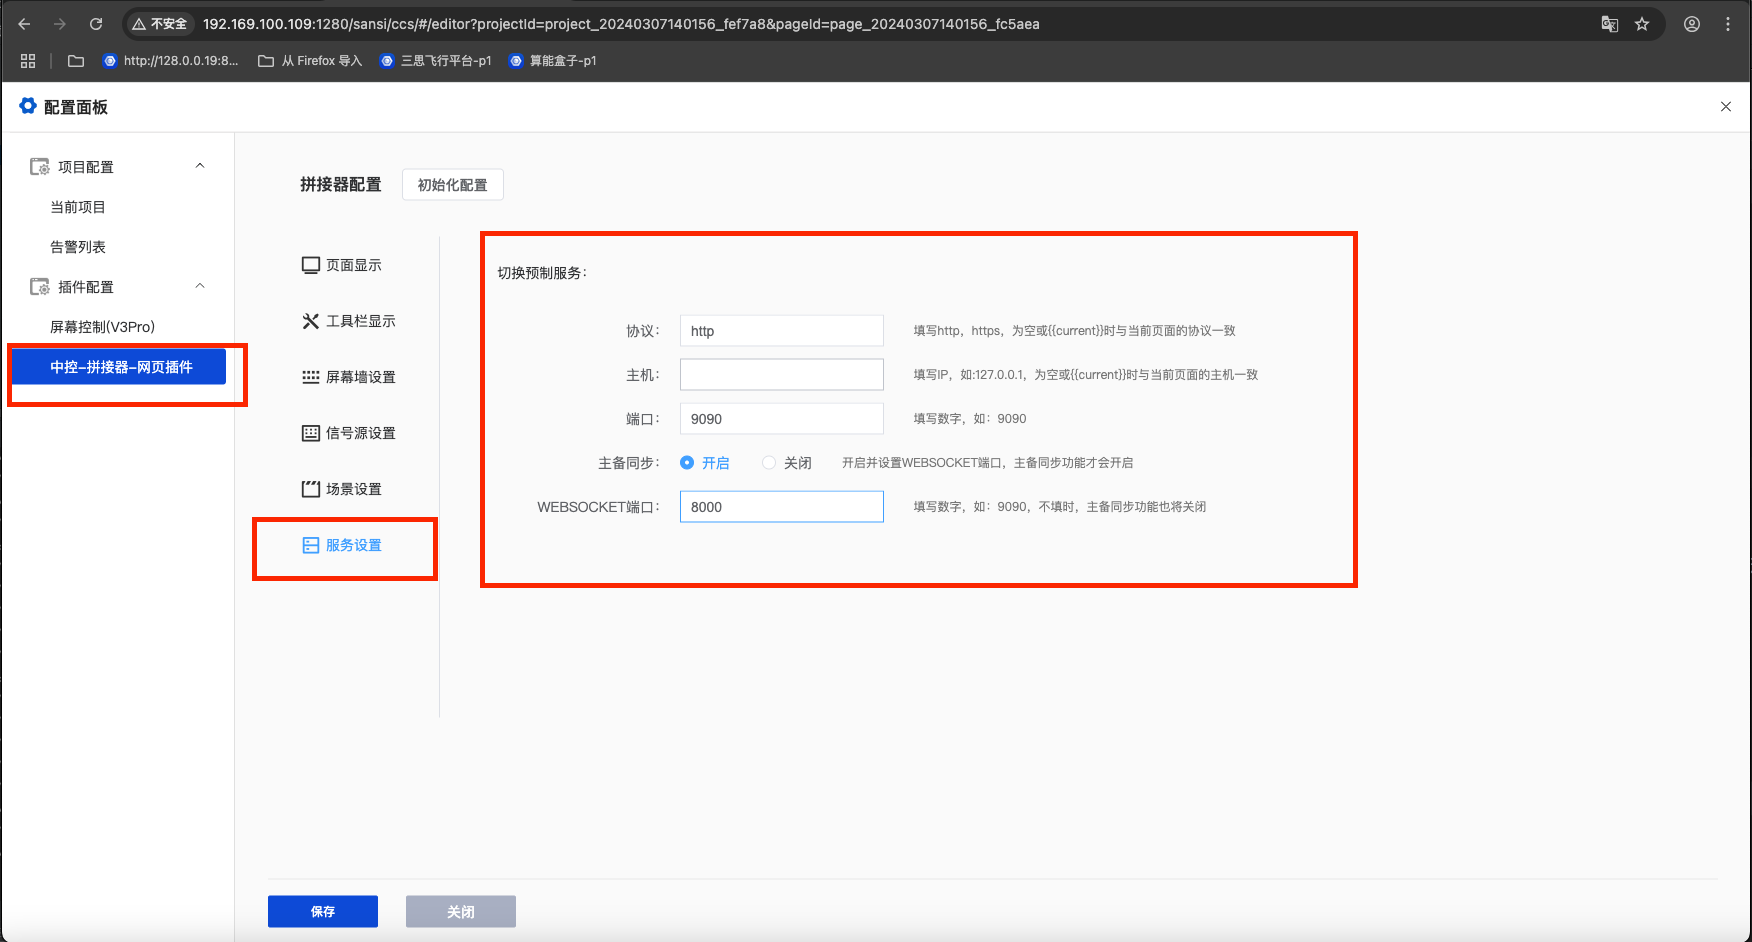
- Note: If the service does not display data, please set the service address and WebSocket port number in the splicer plugin
# 9.2 CyberHub Using Hulk Service Webpage Embedding Mode:
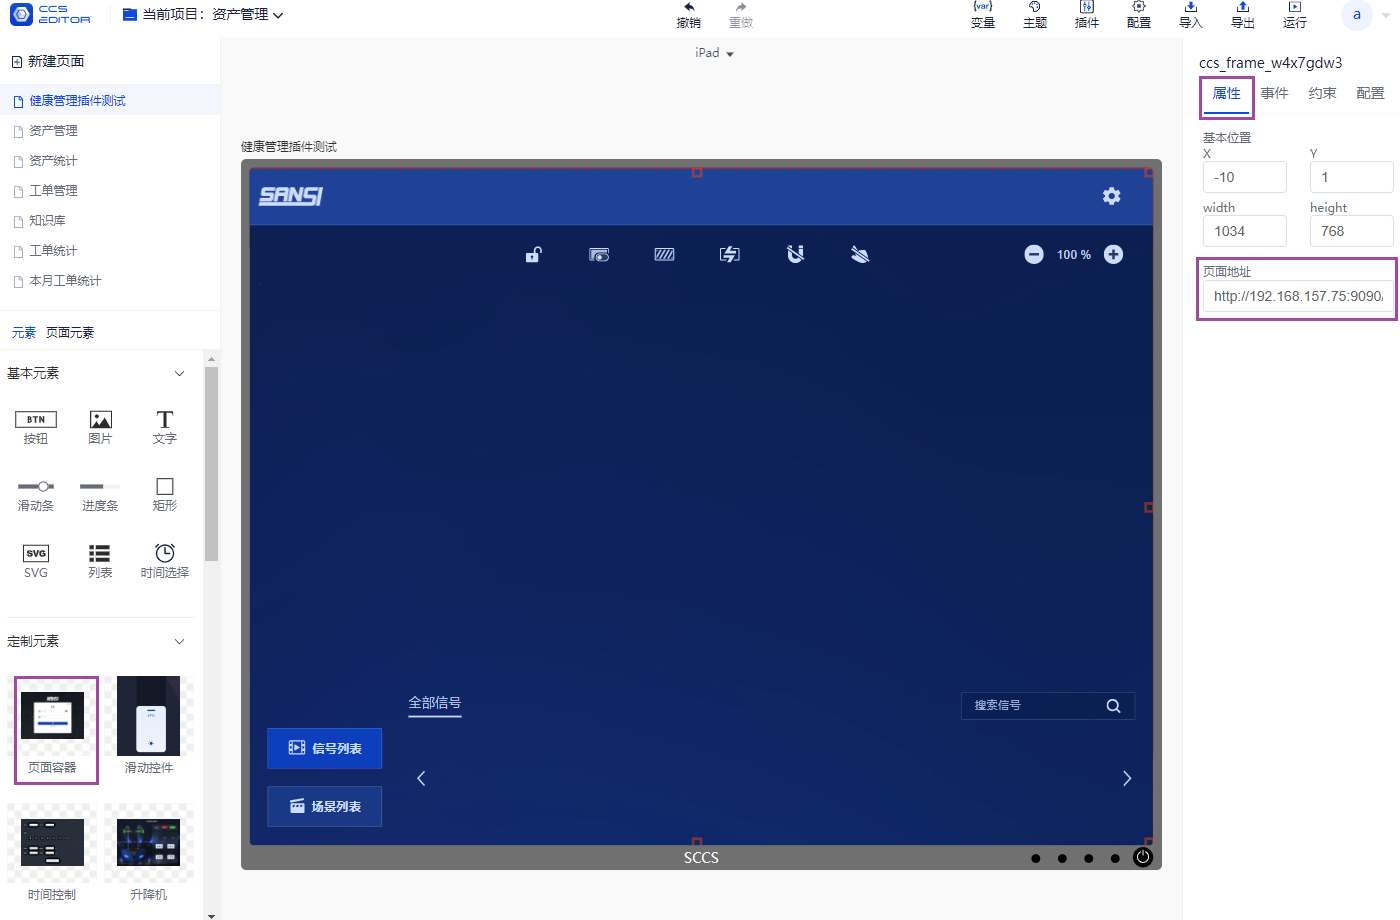
In the editing mode of the universal control system, use the page container component and set the page address of the page container component to the Hulk service address. At this time, the configuration of the splicer control system does not need to be modified.
Recommended
Just enable and configure the Hulk service without modifying the configuration of the splicer control system. To adapt to the project, you need to hide the background color, header and logo in the settings to display the project background image.